
A Complete DIY Guide to RV Gate Valve Replacement: Learn How to Replace RV Gate Valve Yourself
Let’s be real: no one wants to pay $500 or more to have an RV dealer tackle a leaky or stuck waste valve. The good news is, learning how to replace RV gate valve yourself is a totally doable project for most RVers. This isn’t brain surgery, and with a bit of patience, you can swap out that faulty valve and save serious cash.
This guide will walk you through every step of an RV gate valve replacement step by step, from gathering your tools needed to replace RV gate valve to testing your new setup. If you’re still deciding whether repair or full replacement is right for your situation, read our RV Gate Valve Repair vs Replace guide before continuing. For a complete breakdown of how the RV waste system works, start with our Ultimate Guide to RV Gate Valves.
What You’ll Need — Tools & Parts List
Gathering your tools needed to replace RV gate valve before you start will make the job much smoother. Here’s what you’ll want to have on hand:
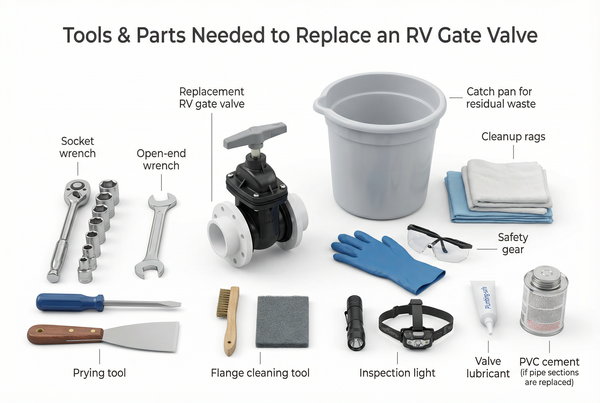
- New Gate Valve: Match the size (3″ for black tanks, 1.5″ or 2″ for grey) and type. Brands like Valterra (e.g., Valterra RV gate valve replacement T03-0169VP for a 3-inch valve) are common and reliable. Your new valve should come with new seals.
- Socket wrench with 5/16″ or 3/8″ sockets (depending on your bolt size). A ratchet or impact driver can speed things up.
- Open-end wrench (matching socket size).
- Flathead screwdriver or putty knife (for prying).
- Bucket or pan (to catch any drips).
- Shop rags or old towels.
- Rubber gloves and eye protection (non-negotiable!).
- Plumbing-safe lubricant (silicone grease or RV valve lubricant).
- PVC cement (if your system requires new pipe sections, less common for simple valve swaps).
- Wire brush or abrasive pad (for cleaning flanges).
- Flashlight or headlamp.
Step 1 — Safely Drain Your RV Tanks
This is the most crucial part of any RV waste valve replacement job, and you absolutely do not want to skip any steps. Work methodically to prevent a messy disaster.
⚠️ Warning: Always wear heavy-duty rubber gloves and eye protection. Even “empty” tanks can have residual waste. Work in a well-ventilated area and avoid splashing.
- Completely Dump Tanks: Your RV black tank valve replacement or RV gray tank valve replacement starts with emptying the tank completely at a proper dump station. Run your tank flush system (if you have one) multiple times until the water runs clear.
- Add Fresh Water: After dumping, put 5-10 gallons of clean water into the tank you’re working on. Add some RV tank cleaner or a good amount of dish soap. Let it sit for a bit while you gather tools.
- Final Rinse: Dump this water after a short drive (if possible) to let it slosh around. This helps clear any lingering debris near the valve. Ideally, do this several times. You want the system as clean as possible before you open it up.
Step 2 — Remove the Four Bolts & Pull the Old Valve
Once your tanks are thoroughly drained and rinsed, it’s time to get hands-on. Be prepared for a possible small amount of liquid, even after the best flush.
- Position Your Bucket: Place a shallow bucket or pan directly under the valve you’ll be removing. This will catch any unexpected drips.
- Access the Valve: Depending on your RV, you might need to crawl underneath or remove a basement panel.
- Loosen the Bolts: You’ll see four bolts holding the valve body between two flanges. These are typically 5/16″ or 3/8″. Use your socket and wrench to carefully loosen them. Go slow, especially if they’re rusted or corroded.
- Remove the Old Valve: Once the nuts are off, you can often gently pry the pipe flanges apart just enough to slide the old valve out. Sometimes the pipes might be a bit stiff. Try to wiggle the valve side to side to break it free. This is how to remove RV gate valve bolts and the valve itself.
💡 Pro Tip: When removing the old valve, pay attention to which way the handle faces relative to the pipes. Some valves are unidirectional, but knowing the orientation helps with reinstallation.
Step 3 — Clean the Flanges & Prep for New Valve
This step is critical for a leak-free seal. Don’t rush it! A clean surface ensures your new RV gate valve flange seal replacement will seat perfectly.
- Scrape Off Old Gasket Material: Use a flathead screwdriver or putty knife to carefully scrape off any old gasket material, dried waste, or mineral deposits from both pipe flanges.
- Clean and Inspect: Use a wire brush or abrasive pad to thoroughly clean the flange surfaces until they are smooth and free of debris. Inspect the pipe ends for any cracks or damage. If you find any, you might need to cut out and replace a section of pipe.
- Dry Thoroughly: Wipe the surfaces clean and dry with a rag.
💡 Pro Tip: Ensure the bolt holes on the flanges are clean. Sometimes old thread locker or corrosion can build up, making bolt installation difficult later.
Step 4 — Install the New Valve & Seals
Now for the satisfying part: putting in your new valve! This is where your RV gate valve replacement step by step really takes shape.
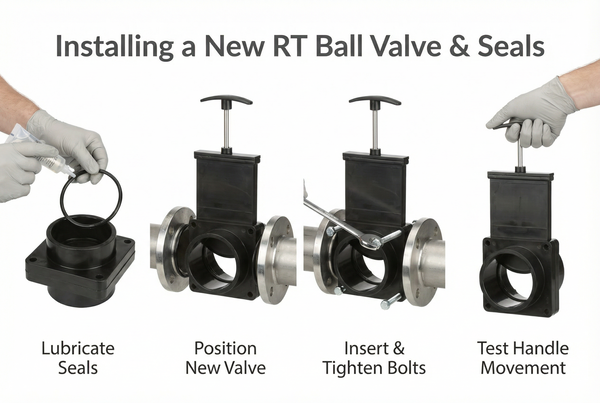
- Lubricate Seals: Take your new valve and its two rubber seals. Apply a generous amount of plumbing-safe silicone lubricant to both sides of each rubber seal. This helps them slide into place and creates a better seal.
- Position New Valve: Place one lubricated seal onto one pipe flange. Then, carefully align and insert the new valve. Push the other lubricated seal onto the other side of the valve, making sure it seats properly against the valve body. Finally, push the second pipe flange into place against the second seal.
- Insert and Tighten Bolts: Reinsert the four bolts through the flanges and the valve. Hand-tighten the nuts initially. Then, use your wrench to tighten them in a crisscross or star pattern. This ensures even pressure and prevents warping. Don’t overtighten, as you could crack the plastic. Just snug is good!
- Test Handle Movement: Once tightened, open and close the new valve handle a few times. It should operate smoothly. If it’s stiff, loosen the bolts slightly and re-tighten in the star pattern.
Step 5 — Test for Leaks Before Buttoning Up
You’ve nearly mastered how to replace RV gate valve! The final, critical step is to perform an RV waste valve replacement test for leaks.
- Fill the Tank: With the new valve fully closed, add 5-10 gallons of clean water to the relevant tank (black or grey). You don’t need to fill it completely, just enough to put some pressure on the new seals.
- Inspect Thoroughly: Get back under your RV with your flashlight. Look carefully around the entire valve assembly – where the seals meet the pipes, around the bolts, and where the handle attaches. Check for any drips or wetness.
- Let it Sit: Leave the water in the tank for at least an hour, or even overnight if possible, and recheck for leaks. A slow drip might not appear instantly.
- If Leaking: If you find a leak, try gently snugging the bolts a bit more in a crisscross pattern. If it still leaks, you might need to dismount the valve, inspect the seals for proper seating, and reassemble.
Once you’re confident there are no leaks, you can close up any access panels and consider the job done!
FAQ — Your Questions Answered
How long does it take to replace an RV gate valve?
For a mechanically inclined DIYer, an RV gate valve replacement typically takes 1 to 2 hours once you have all your tools needed to replace RV gate valve. This includes draining, removal, cleaning, installation, and testing. First-timers might take a bit longer.
Do I need special tools for an RV gate valve replacement?
No, not really. Basic hand tools like a socket wrench, open-end wrench, flathead screwdriver, and a bucket are generally sufficient. You might need a small pry tool for stubborn pipes, but specialized RV tools aren’t usually required for an RV gate valve replacement step by step.
Can a stuck RV black tank valve be replaced the same way as a grey tank valve?
Yes, the process for an RV black tank valve replacement is structurally identical to an RV gray tank valve replacement. The main difference is the diameter of the valve (3″ for black, 1.5″ or 2″ for grey) and the necessity for extremely thorough cleaning of the black tank due to its contents.
How do I know what size replacement RV gate valve to buy?
You’ll need to measure the internal diameter of the pipe opening where the valve sits. Most black tanks use a 3-inch valve, while grey tanks use 1.5-inch or 2-inch valves. Confirm the measurement and match it with the new valve, like a Valterra RV gate valve replacement of the appropriate size.
What if I still have a drip after an RV gate valve replacement?
If you still have a drip after your RV gate valve replacement, it’s often due to improper seating of the RV gate valve flange seal replacement or uneven tightening of the bolts. Re-check the bolts for even tension (tighten in a star pattern). You might need to disassemble, inspect the seals for wrinkles or folds, relubricate, and reinstall. Debris left on the flanges can also cause issues. Make sure your RV waste valve replacement test for leaks is thorough.
Conclusion
Learning how to replace RV gate valve is a valuable skill that empowers you to save significant money on RV maintenance. By following this guide, you can confidently perform an RV gate valve replacement step by step and ensure your waste system is leak-free and working as it should. The satisfaction of a DIY repair is unmatched, especially when you consider the dealer’s bill!
Ready to tackle other common RV plumbing issues? Dive deeper into your RV waste system with our Ultimate Guide to RV Gate Valves for more expert tips and troubleshooting.
Need a high-quality replacement RV gate valve?
“`


 English
 Arabic
 Russian
 French
 Spanish