
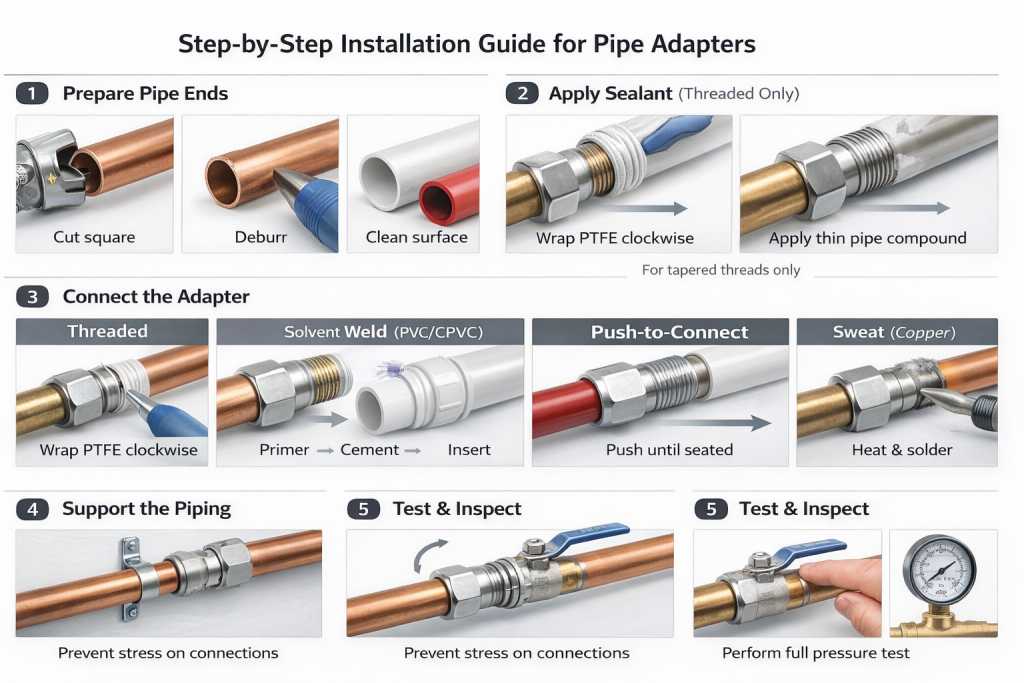
Step-by-Step Guide to Installing Pipe Adapters for Leak-Free Connections
You’ve identified the perfect adapter to bridge the gap between your ball valve and a different pipe size, thread type, or material. That’s a critical first step! But the journey to a truly leak-free and long-lasting connection hinges on one thing: correct installation. Even the best adapter, if installed improperly, is an Achilles’ heel in your fluid system.
This comprehensive BCST Valve guide will walk you through the essential stages of installing pipe adapters, covering everything from crucial preparation to the final leak test. While focusing on general best practices applicable to all adapters, we’ll also highlight specific considerations for different connection types. For a complete understanding of adapter selection, refer to our Complete Guide to Ball Valve Adapters.
Why Proper Adapter Installation is Non-Negotiable
The integrity of your entire plumbing or industrial system can often be traced back to the smallest connections. Correctly installing pipe adapters:
- Prevents Leaks: The most obvious benefit. A well-installed adapter forms a watertight or airtight seal, protecting against costly damage, energy loss, or environmental hazards.
- Ensures System Longevity: Proper installation reduces stress on connections, prevents corrosion (like galvanic corrosion), and extends the lifespan of both the adapter and the connected piping.
- Maintains Flow Efficiency: Incorrectly installed adapters can create turbulence, reduce flow rate, or lead to pressure drops, impacting system performance.
- Enhances Safety: In applications involving hazardous fluids or high pressures, a secure connection is paramount for personnel safety.
Before You Begin: Essential Tools and Preparations
Having the right tools and completing necessary prep work streamlines the installation process and reduces errors.
Required Tools & Materials:
- Safety Gear: Safety glasses, gloves.
- Pipe Cutters/Saw: Appropriate for your pipe material (e.g., PEX cutter, copper tubing cutter, hacksaw for PVC).
- Deburring Tool: For smooth pipe ends.
- Wrenches: Adjustable crescent wrench, pipe wrench, or open-end wrenches for threaded connections.
- Cleaning Supplies: Rags, sandpaper/abrasive pad (for copper prep), PVC/CPVC cleaner.
- Sealants/Adhesives (as applicable):
- PTFE (Teflon) Tape: For tapered threaded connections only.
- Pipe Joint Compound (Pipe Dope): For tapered threaded connections, often used with PTFE tape.
- PVC/CPVC Primer & Cement: For solvent weld connections.
- Solder & Flux: For copper sweat connections.
- Gaskets/O-rings: For parallel threaded connections or flanged connections.
Critical Preparations:
- Shut Off Supply: Always turn off the main water or fluid supply to the area.
- Depressurize & Drain: Open nearby faucets or valves to relieve pressure and drain the line.
- Clean Work Area: A tidy environment helps prevent contamination and loss of small parts.
- Inspect Components: Visually check pipes, valves, and adapters for any damage, burrs, or debris.
Step-by-Step Installation Guide for Pipe Adapters
While specific steps vary by connection type, the general flow remains consistent. We’ll detail the common approaches below.
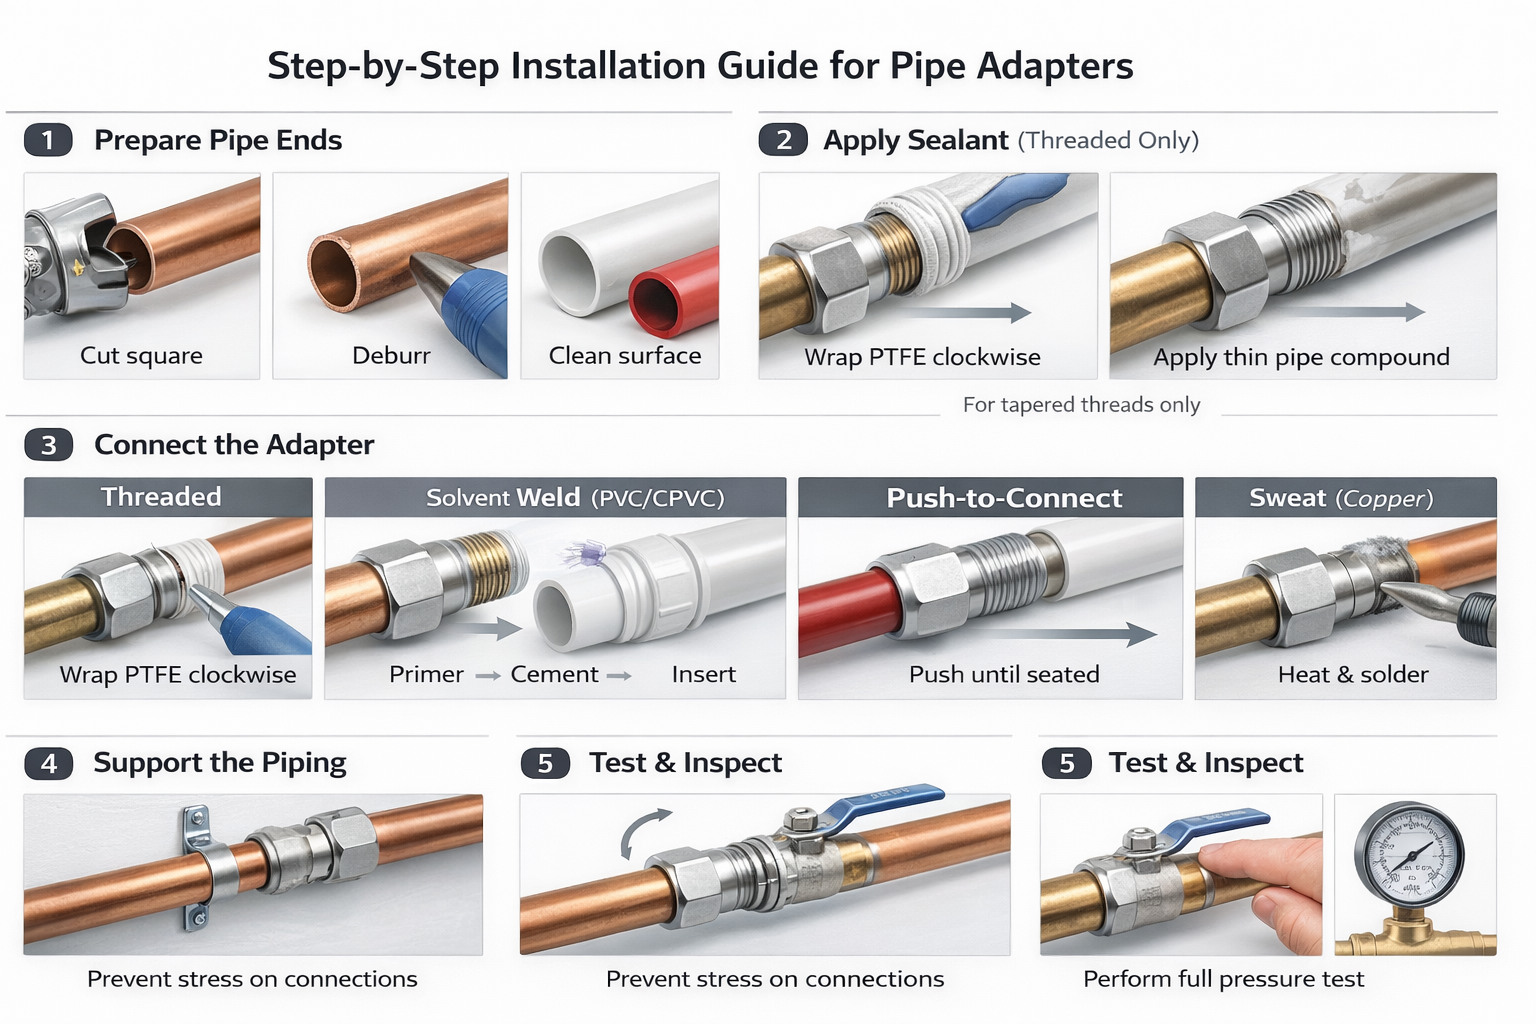
Step 1: Prepare Pipe Ends
Accurate, clean pipe preparation is fundamental to a good seal.
- Cut Square: Use a proper cutter to make a straight, perpendicular cut to the pipe’s length. Uneven cuts compromise the seal.
- Deburr: Remove any internal or external burrs created by cutting. Burrs can restrict flow, damage O-rings, or snag PEX.
- Clean: For copper, use sandpaper or an abrasive pad to clean the pipe end until shiny. For PVC/CPVC, use an approved cleaner. For PEX, ensure the cutting edge is smooth.
Step 2: Apply Sealant (for Threaded Connections)
This step is crucial for tapered pipe threads (NPT, BSPT). Parallel threads (BSPP) require a gasket or O-ring, not tape or dope.
- PTFE Tape: Wrap 2-3 layers of PTFE tape clockwise around the male threads. Ensure the tape sits in the thread grooves and doesn’t overlap excessively at the beginning. Wrap clockwise so it tightens, not unwraps, as you screw in the connection.
- Pipe Dope: Apply a thin, even layer of pipe joint compound over the PTFE tape. This lubricates the threads, aids in sealing, and prevents galling. Do not let sealant enter the pipe opening.
Step 3: Connect the Adapter
The method here depends on the type of adapter:
- For Threaded Adapters:
- Start by hand-threading the adapter onto the valve or pipe. Ensure it threads smoothly without resistance, indicating no cross-threading.
- Once hand-tight, use wrenches to tighten further. For metal fittings, use one wrench to hold the valve/pipe steady and another to turn the adapter. Tighten another 1-3 turns after hand-tight, depending on size and material. Do NOT over-tighten, especially with plastic fittings, as this can cause cracking or stripping.
- For Solvent Weld (PVC/CPVC) Adapters:
- After cleaning, apply a generous coat of primer to both the pipe exterior and the adapter’s socket interior.
- Immediately apply a thick, even coat of appropriate solvent cement to both primed surfaces.
- Firmly insert the pipe straight into the adapter socket, giving it a quarter turn to distribute the cement evenly. Hold for 15-30 seconds to allow initial set.
- Wipe off excess cement. Allow adequate cure time before pressurizing (check manufacturer’s instructions).
- For Push-to-Connect Adapters:
- Ensure the pipe end is clean, square, and burr-free.
- Firmly and squarely push the pipe into the adapter until it bottoms out. You may feel two distinct clicks as it passes through the grab ring and then the O-ring.
- Give a gentle tug to ensure it’s securely seated.
- For Sweat (Solder) Adapters (Copper): (Refer to our Connecting Ball Valves to PEX, Copper & PVC guide for detailed soldering steps). This involves cleaning, fluxing, heating, and applying solder.
Step 4: Support the Piping (If Necessary)
For heavy valves or long runs of pipe, ensure adequate support is in place. Stress from unsupported weight can lead to connection failure over time.
Step 5: Test for Leaks and Inspect
This is the final, critical step to verify your work. Never skip it!
- Slowly Restore Pressure: Gradually turn the fluid supply back on. Avoid sudden surges that could stress new connections.
- الفحص البصري: Closely examine all new connections for any signs of weeping, dripping, or bubbling (if using soapy water for gas lines).
- Address Leaks:
- For minor threaded leaks, a slight additional tightening might help, but often it’s best to disassemble, reapply sealant, and re-tighten.
- For solvent weld or sweat connections, a leak almost always means you need to cut out the joint and re-do it entirely.
- Full Pressure Test: For critical or large-scale systems, perform a full pressure test according to industry standards before putting the system into service.
Common Pitfalls & Troubleshooting Tips
- Cross-Threading: Always start connections by hand to feel for smooth engagement. If it jams, back off and try again.
- Over-Tightening: Especially with PVC/CPVC or small brass fittings, over-tightening can cause invisible cracks that lead to leaks later. Know the recommended torque for your fittings or tighten until snug and then an additional 1-2 turns.
- Inadequate Sealant: Not enough PTFE tape, incorrect application direction (counter-clockwise), or no pipe dope can lead to leaks.
- Skipping Prep: Not cleaning or deburring pipe ends can cause direct leaks or damage to internal seals.
- Galvanic Corrosion: If connecting dissimilar metals (e.g., steel pipe to a brass adapter), ensure a dielectric union is used to prevent rapid corrosion.
خاتمة
Installing pipe adapters correctly is a skill that directly impacts the reliability and safety of any fluid system. By meticulously following these step-by-step instructions—from proper preparation and sealant application to careful tightening and thorough leak testing—you can achieve professional, leak-free results every time.
At BCST Valve, we believe in providing not just superior ball valves and adapters, but also the knowledge to ensure they are installed to perform at their best. Trust BCST products for your critical connections.
Ready to secure your piping systems with confidence?


 English
 Arabic
 Russian
 French
 Spanish