
A slow drip quickly becomes a major headache. You see the signs of a leak, and your mind starts racing about safety hazards and expensive downtime. You just need a solution that works.
A gate valve leaking is a serious issue, and it is an issue you can handle. Your first job is to find exactly where it is leaking from—the stem, the bonnet, or the flanges—and then follow safe repair steps. If it is an internal leak, a full replacement is the solution.
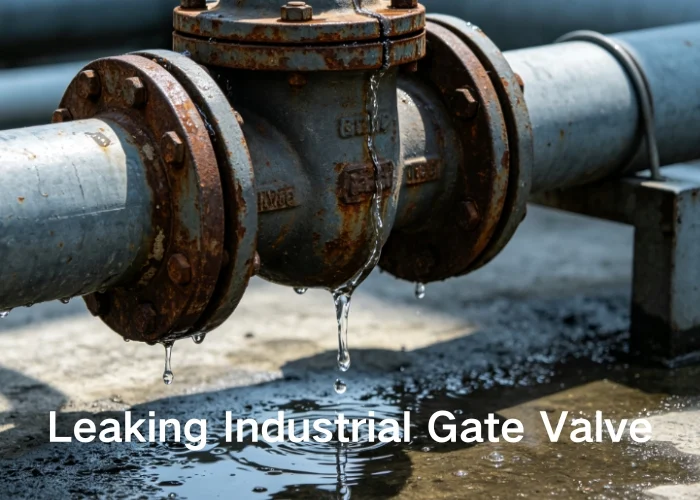
That sinking feeling when you spot a leak is something I know well. I’ve stood on project sites with clients, sharing their frustration as every lost drop represents lost money. I’ll never forget one time at a chemical plant. A small gate valve leaking issue seemed minor on the night shift. By morning, it was a major safety risk and had forced a plant-wide emergency shutdown. The Chief Engineer, a man named Hassan with decades of wisdom, looked at me and said, “Emily, our biggest enemy isn’t the big explosions you see in movies. It’s the small, ignored leaks.” He was absolutely right. Those small problems are warnings. The good news? If you know the signs, you can catch them early. Let me walk you through what I’ve learned over the years, from the factory floor to complex client sites.
How to Identify a Leaking صمام البوابة
Your system pressure is dropping, but you can’t see why. Letting it go will cause a major safety incident and kill your efficiency. You have to know for sure if a valve is failing.
To find a gate valve leaking, first, use your eyes. Look for drips, puddles, or rust stains around the valve. Pay close attention to where the stem enters the valve and the seam where the top is bolted on. Next, use your ears. A hissing sound is a dead giveaway for a gas leak.
Diving Deeper into Leak Detection
Pinpointing a leak is the first real step. A gate valve leaking shows itself in obvious or sneaky ways, depending on what is flowing through your pipes. You have to be a detective and use all your senses. Back when I was learning valve assembly on the factory floor, my father taught me that every machine tells a story if you just pay attention. It’s the same with a valve in a busy plant. A subtle hiss or a bit of discoloration is the first chapter in a story about a gate valve leaking.
1. Visual and Physical Checks
This is where you start. Get up close and look at the valve’s key areas.
- External Leaks: These are the obvious ones. You will see fluid dripping or forming a puddle right under the valve. The first place to check is the packing nut, just under the handwheel—this is the most common spot for a gate valve leaking. Also, run your gloved hand around the flange connections and the main bonnet gasket seal. If the fluid is aggressive, you will see peeling paint or ugly rust stains, which tell you this leak has been happening for a while.
- Internal Leaks: These are much harder to spot. From the outside, the valve looks perfectly fine, but fluid is seeping past the gate inside, even when it is shut tight. You will only catch this by watching your system. Is a tank filling up when it should not be? Is the pressure gauge on one side of the valve dropping? That is your clue the gate or seat inside is damaged.
2. Sound and Temperature Clues
You often hear a problem before you see it.
- Hissing Sounds: When you are moving gas, air, or steam, a sharp hissing sound is an unmistakable sign of a gate valve leaking. That is the sound of high-pressure gas or steam escaping through a tiny opening.
- Temperature Changes: On hot lines, an infrared thermometer is a great tool. Scan the area around the valve. A spot that is way hotter or colder than the rest of the pipe is a huge red flag for a leak.
Here is a quick guide to put it all together:
| Identification Method | What to Look For | Leak Type |
|---|---|---|
| Visual Check | Drips, stains, rust around stem/bonnet | External Leak |
| Pressure Gauge | Pressure drops even when the valve is closed | Internal Leak |
| Sound Check | Hissing or whistling from the valve | External Leak (Gas/Steam) |
| Downstream Check | Flow or pressure changes past the closed valve | Internal Leak |
With this approach, you can confirm you have a gate valve leaking and know where to focus your attention for the fix.
Common Causes of Gate Valve Leaks
You’ve found the leak, great. But if you don’t know لماذا it happened, you’ll be back here fixing it again in a few months. That is just a waste of time and money.
أ gate valve leaking points to a few common culprits: old, worn-out packing around the stem, a damaged gate or seat inside, or a failed gasket. Other causes are corrosion, bad installation, and wild swings in system pressure and temperature.
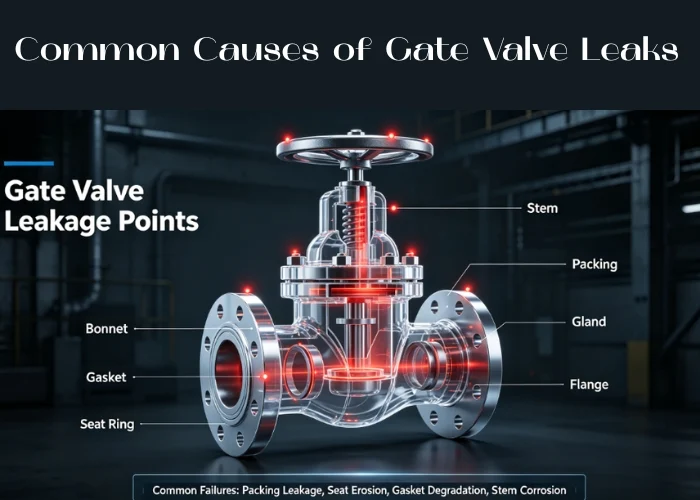
Diving Deeper into Root Causes
Fixing the leak is only half the battle. If you don’t understand why the gate valve leaking started, you’re doomed to repeat the problem. In my experience, most valve failures are preventable. They are either from normal aging that was ignored or from the valve being used incorrectly. My father always said, “A valve is a simple machine, but it lives in a complex world.” That world of pressure, heat, and chemicals is what we need to break down.
1. Packing and Gasket Failure
This is the number one cause of leaks you can see on the outside.
- Stem Packing Wears Out: The packing is a set of rings that seal the gap around the moving stem. Every time you turn the valve, it rubs against them. Add in heat and chemicals, and over time that packing material gets hard, shrinks, and wears away. That creates a path for fluid to escape. It’s the main reason you will see a gate valve leaking from the top.
- Bonnet Gasket Gives Up: The large gasket that seals the top of the valve to the body also fails. This happens when vibration loosens the bolts over time, or when the gasket material itself just gets old and brittle.
2. Internal Damage to Gate and Seats
This is what causes those sneaky internal leaks.
- الأوساخ والحطام: When you have solids or grit in your fluid, they get caught between the gate and the seat as the valve closes. This not only stops it from sealing but physically scratches or gouges the metal surfaces, creating a permanent leak. This is a big reason why a gate valve leaking is common in slurry applications.
- Throttling Kills Gate Valves: Gate valves are meant to be fully open or fully closed, like a light switch. Using them halfway to control flow (throttling) is a recipe for disaster. It creates intense turbulence that acts like a sandblaster on the gate and seat. I have seen brand-new valves completely destroyed in months because operators used them to throttle.
- التآكل: Corrosive fluid eats away at the smooth, machined surfaces of the gate and seats, making a tight seal impossible.
3. Bad Installation or System Stress
Sometimes the problem was created before the valve was even put into service.
- Poor Installation: If the pipes are not aligned correctly, it puts a huge strain on the valve body, which causes gaskets to fail. Overtightening bolts, especially unevenly, also crushes and ruins a perfectly good gasket.
- Pipe Stress: Heavy vibration in the pipes or constant expansion and contraction from temperature changes puts stress on the valve’s connections, leading to leaks.
Here is a quick summary of what causes the problem:
| Cause Category | Specific Reason | Resulting Leak Type |
|---|---|---|
| Wear and Tear | Worn stem packing, old gaskets | External |
| Internal Damage | Scratched seat/gate from debris or throttling | Internal |
| Chemical Attack | Corrosion of sealing surfaces | Internal / External |
| Operational Error | Bad installation, pipe stress | External |
When you find the real cause, you do not just fix the gate valve leaking today. You prevent it from happening again tomorrow.
A Step-by-Step Guide to Fixing a Leaking Gate Valve
You know you have a leak and you know why. Now it is time to fix it. Doing it wrong is not just ineffective—it is dangerous. You need a clear, safe plan.
First, and always, isolate the valve and release the pressure. For a stem leak, start by gently tightening the packing nuts. If the gate valve leaking continues, you replace the packing entirely. For bonnet leaks, tighten the bolts; if that fails, replace the gasket.
Diving Deeper into the Repair Process
Okay, let’s talk about getting your hands dirty. But before you touch a single bolt, we have to talk about safety. Seriously. Working on pressurized lines is no joke. A mistake will get you or someone else badly hurt. I learned on the factory floor that the most important tool you have is your brain. Think through the safety steps first. Always follow your plant’s specific safety rules, but here is the general process for fixing a gate valve leaking.
The Most Important First Step: Safety Prep
DO NOT SKIP THIS. EVER.
- Isolate: Shut off the valves on both sides of the leaking valve to stop the flow.
- Lockout/Tagout (LOTO): Put your lock and tag on the isolation valves. This ensures nobody can open them while you are in the line of fire.
- إزالة الضغط والتصريف: Safely open a vent or drain to bleed off all pressure between the isolation valves. Let all the fluid drain out.
- Wear your PPE: Put on your safety glasses, chemical-resistant gloves, and whatever else is required for handling the specific fluid in that line.
1. Fixing an External Leak from the Stem Packing
This is the most frequent issue and thankfully, often the easiest fix for a gate valve leaking.
- Step 1: Gently Tighten the Packing Gland Nuts. Use two wrenches—one to keep the bolt from spinning, and one to turn the nut. Tighten the nuts just a little, a quarter-turn at a time. Alternate between them to keep the pressure even. This is all it takes to stop the leak. Do not go crazy with the wrench; overtightening damages the packing and makes the valve impossible to turn.
- Step 2: Check Your Work. Next, you carefully re-pressurize the line to see if the leak stopped. Be ready to shut it down again if it has not.
- Step 3: Replace the Packing. If it still leaks, the packing is shot.
- Ensure the line is fully depressurized and locked out.
- Open the gate valve all the way. Some valves have a “backseat” that helps seal the stem when fully open.
- Take off the packing gland nuts and follower.
- Use a packing extractor to pull out all the old rings.
- Clean out the stuffing box and wipe down the stem. Any leftover grime will ruin the new seal.
- Put in the new packing rings one by one. Stagger the joints of each ring (e.g., at 12 o’clock, 6 o’clock, 3 o’clock, etc.).
- Put the gland follower back on and tighten the nuts until they’re snug.
2. Fixing an External Leak from the Bonnet Gasket
This fix is a bigger job than a simple packing tweak.
- Step 1: Tighten the Bonnet Bolts. With the line depressurized, use a wrench and tighten the bonnet bolts in a star or crisscross pattern. This keeps the pressure even on the gasket.
- Step 2: Replace the Bonnet Gasket. If tightening did not work, the gasket is done.
- You will need to remove all the bonnet bolts and lift the whole bonnet assembly off. Be prepared to work at it, as it will be stuck.
- Peel off the old gasket and then meticulously clean both metal surfaces. Any little piece of old gasket left behind will cause your new one to fail.
- Put the new gasket in place. Double-check that it is the right size and material.
- Put the bonnet back on and tighten the bolts in a star pattern to the manufacturer’s recommended torque.
A valve has a finite lifespan. If you have an internal leak, or if these other fixes do not hold and the gate valve leaking continues from deep corrosion or damage, it is time to replace it. The cost and downtime of machining internal parts are not worth it.
If your repairs do not hold, or you see the gate valve leaking is from deep corrosion or damage, do not risk it. A failing valve is not worth the danger to your people or your plant. For a replacement you can rely on, you need a partner who gets it. At BCST Valve, my family’s business has always been about building quality industrial valves that last. We make products designed for tough service to prevent these problems from day one. You can see our gate valves at https://bcstvalve.com/.
Frequently Asked Questions (FAQs)
Q1: Can I fix a gate valve while it is under pressure?
A: Absolutely not, unless you are just making a tiny adjustment to the packing nuts. For any real repair like replacing parts, the line must be fully isolated and depressurized. It is a massive safety risk otherwise.
Q2: How often should I check my gate valves for leaks?
A: That depends on how critical the line is. For high-pressure or hazardous chemical lines, a quick visual check every day is a good idea. For less critical systems, a check during your weekly walk-down is enough to catch a gate valve leaking early.
Q3: What happens if I use a gate valve to throttle flow?
A: You will destroy it. Throttling creates intense turbulence that erodes the gate and seat. It will quickly cause a permanent internal leak, and you will have to replace the entire valve much sooner than you should.
Q4: Why is my brand-new gate valve already leaking from the stem?
A: This happens for a few reasons. The packing settled during shipping and just needs a gentle tightening. Another reason is that the installation put stress on the valve, or the packing material is not right for your specific process fluid.
Final Thought
أ gate valve leaking is not just a drip; it is a risk to your safety, your budget, and your production. Taking the time to properly identify, understand, and fix the root cause protects your whole operation. For valves engineered to give you peace of mind, trust اختبار BCST for reliability.


 English
 Arabic
 Russian
 French
 Spanish