
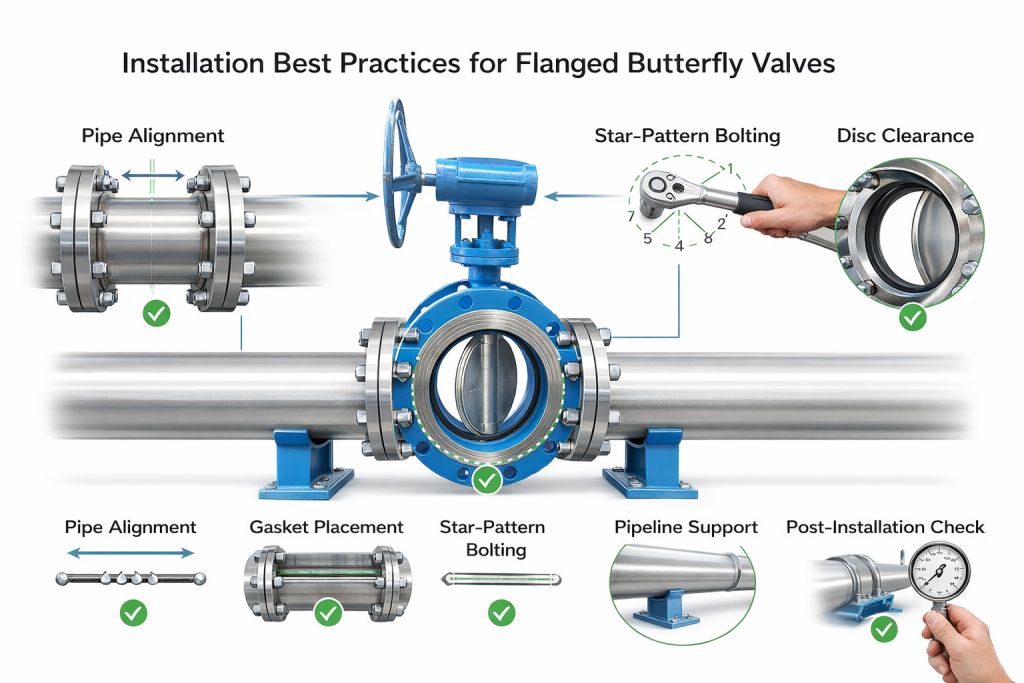
Mastering Flange Butterfly Valve Installation: Best Practices for Longevity and Performance
A butterfly valve is a workhorse in fluid control, but its lifetime and reliability hinge critically on proper installation. For flange butterfly valves, where the connection points are integral to their functionality and the pipeline’s integrity, meticulous attention to installation best practices is not just recommended; it’s imperative. For flange butterfly valves—a category of valves known for their robust, bolted connections—the installation process is critical to functionality. Understanding the different types, from wafer and lug to double-flanged, helps inform the nuances of this process. Incorrect installation can lead to leaks, premature wear, operational failures, and ultimately, costly downtime. Published work on butterfly valves shows that their installed performance (torque, leakage, and downstream flow behavior) is strongly influenced by how and where they are installed, especially relative to upstream disturbances and flange conditions.
This comprehensive guide, informed by years of BCST Valve’s expertise, will walk you through the essential steps to ensure your flanged butterfly valves are installed correctly, guaranteeing maximum service life and optimal performance across your industrial applications.

إرشادات التثبيت الأساسية لصمامات الفراشة ذات الشفة
Proper installation ensures a long service life and reliable operation for your flange butterfly valve. Avoid common pitfalls by adhering to these guidelines:
1. Precision Pipe Alignment
This is perhaps the most fundamental step. Ensure the mating pipe flanges are perfectly aligned and parallel, with no gaps or angular misalignment. Any deviation—whether angular (pipe ends not parallel) or offset (pipe centers not perfectly concentric)—will introduce stress onto the valve body and its sealing components. Force-fitting misaligned pipes can warp the valve, compromise the seat integrity, and lead to leaks or even structural failure over time. Always adjust the piping system first; never use the valve’s bolts to pull misaligned pipes into position. Utilize pipe jacks, supports, and alignment tools, checking visually and with measurements.
2. Gasket Selection and Meticulous Installation
The gasket creates the critical seal between the valve flanges and the pipe flanges. Its correct selection and placement are paramount:
- اختيار الحشية: The gasket material must be chemically compatible with the process fluid, as well as rated for the operating temperature and pressure. Common materials include EPDM, NBR (Buna-N), PTFE, or spiral-wound gaskets for higher-performance applications. Using an incompatible gasket will lead to rapid degradation and leaks.
- النظافة: Before installation, ensure all flange faces, bolts, and gaskets are thoroughly cleaned and free from old gasket material, rust, dirt, or debris. Contaminants can create preferential leak paths.
- Proper Placement: Accurately position the gasket. For wafer-style butterfly valves, ensure the gasket (often a full-face or ring gasket designed for butterfly valves) is correctly centered and does not obstruct the valve disc’s movement when opened.
- Lubrication (Caution): Follow manufacturer guidelines regarding bolt lubrication. A thin layer of anti-seize compound on bolt threads can prevent galling and ensure accurate torque application. However, over-lubricating can lead to over-torquing, which may stress the bolts beyond their yield point or damage the gasket.
3. The Art of Bolting Procedure
Tightening bolts isn’t just about making them “tight”; it’s about achieving even compression across the entire flange interface. Use a calibrated torque wrench and adhere to these steps:
- Star-Pattern Tightening: Always use a diagonal or “star” tightening pattern for bolts. This ensures uniform loading on the gasket and prevents uneven stress on the flange faces.
- Incremental Torque: Do not tighten bolts fully in one pass. Tighten them incrementally, typically in 3-4 stages (e.g., 30%, 60%, and 100% of final torque). This allows the gasket to compress gradually and distribute stress uniformly.
- Manufacturer’s Specifications: Always refer to the manufacturer’s specified torque values for the bolts. Under-torquing can lead to leaks, while over-torquing can permanently damage the gasket, deform the flanges, or stretch the bolts, compromising the connection’s integrity.
4. Verify Disc Clearance
Before and during initial installation, especially for wafer and lug valves, it is absolutely crucial to confirm that the valve disc can fully open and close without interfering with the pipe’s inner diameter, adjoining pipe walls, or any adjacent equipment (e.g., strainers, orifice plates). If the disc snags, it can prevent full closure, cause premature wear, or damage the valve/piping. To check this:
- Operate the valve manually through its full range of motion while positioned between the piping but before final bolt tightening.
- Ensure there’s adequate space for the disc. For some valves, this might mean inserting spacers or ensuring specific pipe fittings are not too close.
5. Adequate Upstream/Downstream Support
Ensure that the pipeline adequately supports the valve’s weight, especially for larger diameter or heavier double-flanged units and those equipped with heavy actuators. Insufficient support can lead to pipe sag, put undue stress on the valve body, and eventually cause misalignment or leakage. Use appropriate pipe hangers and supports on both sides of the valve, close to the connection points, to prevent stress concentration.
6. Post-Installation Checks and Testing
Once installation is complete, a final round of checks is non-negotiable before commissioning the line:
- اختبار التسرب: Perform hydrostatic or pneumatic tests as per project specifications and pipeline standards to confirm leak-free operation. This is critical for safety and operational integrity.
- Functionality Test: Operate the valve through a few full cycles (open to close) to confirm smooth operation and verify limit switch feedback (if applicable).
- Documentation: Record installation details, including torque values used, personnel involved, and test results for future maintenance and troubleshooting.
Additional Installation Considerations
Beyond the core guidelines, keep these general best practices in mind for any flange butterfly valve installation:
- Storage and Handling: Store valves in a clean, dry environment, protected from physical damage. Lift valves correctly using lifting eyes (if provided) or proper slings, never by the actuator or handwheel.
- Safety First: Always wear appropriate Personal Protective Equipment (PPE) during installation. Ensure the work area is clear, and follow all site safety protocols.
- Direction of Flow vs. Disc Orientation: While many butterfly valves are bi-directional, some high-performance or specific soft-seated designs might have a preferred flow direction or disc orientation relative to upstream/downstream pressure for optimal sealing. Always check the manufacturer’s manual.
- إمكانية الوصول: Install valves with enough clear space for future maintenance, inspection, or actuator service. Ensure handwheels or actuators are easily accessible.
خاتمة
The reliable performance and extended lifespan of your flange butterfly valve are directly linked to the precision and care taken during its installation. By diligently following these best practices—from ensuring impeccable pipe alignment and correct gasket handling to precise bolting and rigorous post-installation checks—you lay the foundation for a robust, leak-free, and efficient flow control system.
At BCST Valve, we are committed to not only supplying high-quality, durable flanged butterfly valves but also empowering our clients with the knowledge to maximize their investment. Prioritize these installation guidelines to secure operational integrity and safety for your facility.
Seeking expert guidance or premium flanged butterfly valves?


 English
 Arabic
 Russian
 French
 Spanish