
Before & After of 5-Degree Actuator uses
Your brand-new, expensive actuated valve is already leaking from the stem. You blame the manufacturer and order new packing, but the hidden cause is a simple assembly error that’s silently destroying the valve from within.
A ball valve leaking at the handle area is almost always caused by damaged stem packing. In an actuated valve, even a slight 5-degree misalignment during mounting creates a destructive sideload that grinds away the packing, guaranteeing a complete seal failure in record time.
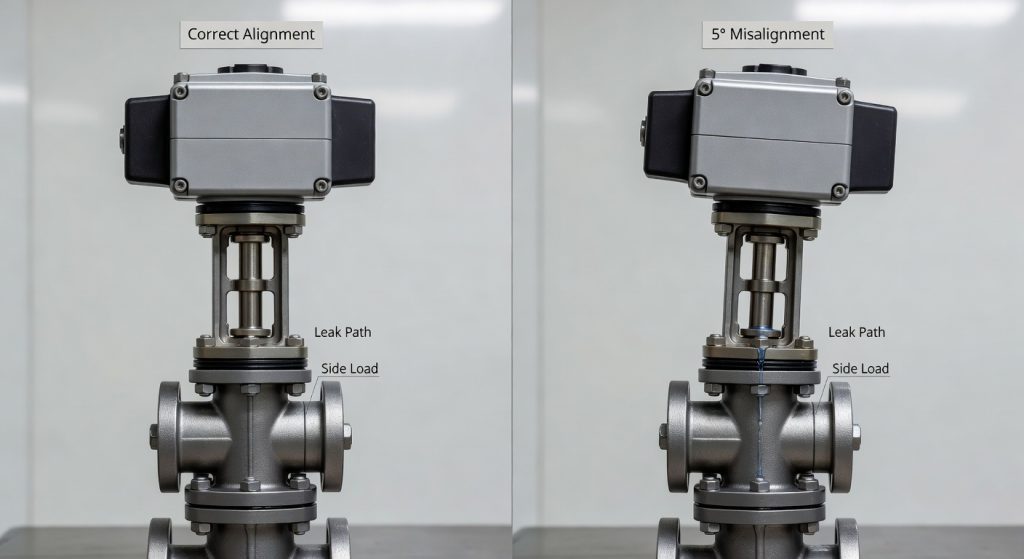
How Perfect Alignment Prevents a Stem Leak
Perfect alignment is critical because it ensures the actuator’s power is applied as pure rotational torque along the valve stem’s central axis. This prevents any sideways force (sideload), allowing the stem packing to do its job and seal effectively without being destroyed.
Dive Deeper: The Mechanics of a Perfect Seal vs. a Slow Death
A valve’s stem packing is designed to contain immense pressure while allowing the stem to turn thousands of times. But it has one critical weakness: it’s designed to seal a rotating shaft, not a wobbling one.
- 1. The Perfectly Aligned System: The stem rotates cleanly within the packing. The soft packing material is evenly compressed, creating a reliable, long-lasting seal. This is the ideal state.
- 2. The Misaligned System: A crooked actuator creates a powerful sideload. Instead of rotating smoothly, the stem now grinds into the packing on every cycle, like taking sandpaper to the seal. The constant wobble deforms the packing into an oval shape, creating a direct leak path.
| Параметр | Perfectly Aligned | 5-Degree Misalignment |
|---|---|---|
| Primary Force | Pure Axial Torque | Torque + Sideload (Bending Force) |
| Stem Movement | Smooth Rotation | Abrasive “Wobble” and Rotation |
| Seal Lifespan | 250,000+ Cycles (Expected) | < 10,000 Cycles (Failure in months) |
| Результат | Reliable, emission-free operation | “Ball valve leaking at handle,” fugitive emissions |
Telltale Signs of Actuator Misalignment: A Diagnostic Checklist
When a new actuated valve fails, you need to be a detective. Simply replacing the packing without diagnosing the root cause is a recipe for repeated failure. Here’s what to look for when you encounter a “ball valve leaking at handle” on an automated assembly.
Phase 1: In-Situ Inspection (Before Disassembly)
- Visual Alignment Check: Use a precision square. Is the actuator perfectly perpendicular to the valve? Look for a gap on one side of the mounting bracket.
- Listen Carefully: Cycle the actuator. A misaligned unit may produce a subtle groaning, scraping, or binding sound.
- Check the Bolts: Are the mounting bolts tightened evenly? Uneven torque is a primary cause of misalignment.
Phase 2: Forensic Analysis (During Disassembly)
If you disassemble the valve, the components tell the story:
- The Stem Tells All: A stem under sideload will be mirror-polished or scored on one side from grinding. A healthy stem has uniform wear.
- Examine the Packing: The packing rings will be deformed. One side will be crushed and flattened, while the other side looks almost new.
- Look for Metal Dust: Fine metal dust on the mounting bracket or coupling is a sign of grinding.
Conclusion: Installation is Everything
A leaking stem on a new actuated valve is almost always a sign of a bad installation, not a bad valve. By ensuring perfect, even torque on mounting bolts and verifying alignment before commissioning, you prevent destructive sideload and guarantee a long, leak-free service life for your assets.
Get Perfect Alignment, Every Time
Our automation center assembles and tests every actuated valve to ensure perfect alignment and torque before it ships.


 English
 Arabic
 Russian
 French
 Spanish