
Are you tired of unexpected shutdowns caused by valve failures? The problem isn’t the whole valve, but one small, overlooked part. Knowing each component is your best defense against costly downtime and a huge step toward a safer plant.
A gate valve has three main groups of parts: the body, the bonnet, and the trim (which is the gate, seats, and stem). Understanding what these gate valve parts do lets you spot problems early, perform the right maintenance, and keep your whole system running smoothly.
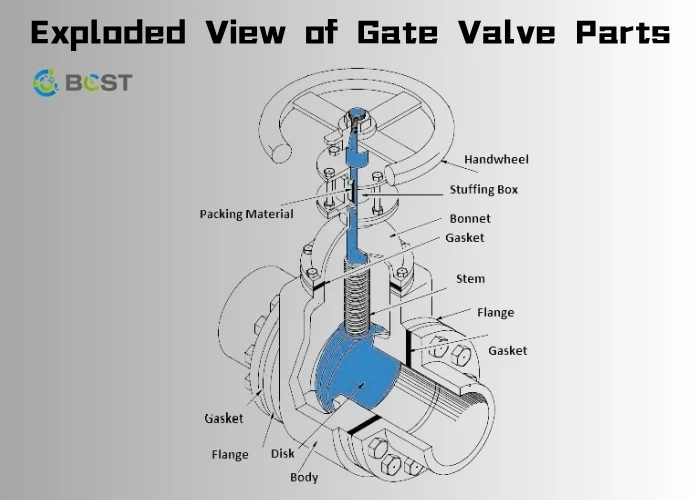
When you look at a gate valve, you just see a single piece of heavy equipment. But inside, it is a team of components working in perfect sync. A breakdown happens when one member of that team fails. I will never forget a call I got from a client, Hassan, who is a Chief Engineer at a refinery in Nigeria. He had a massive pipeline issue that brought a whole section of the plant to a halt. It all came down to one tiny, corroded part inside a critical gate valve. That one failure cost his company days of production and a fortune in lost revenue. His experience taught me a valuable lesson: knowing the internals isn’t just for the maintenance crew; it is essential for every engineer and manager. So, let’s peel back the layers and see what’s inside. Understanding these gate valve parts is how you take control of your system and prevent disasters like the one Hassan faced.
A Detailed Breakdown of Задвижка Parts and Their Functions
Let’s be honest, all the technical jargon around valves is a headache. Terms like “bonnet,” “yoke,” and “trim” get thrown around, and it makes selecting or repairing a valve feel overwhelming. Let’s break it down into simple terms so you know exactly what each part does.
The main gate valve parts are the body (the main pressure vessel), the bonnet (the cover on top), and the trim. The trim is made up of the moving parts on the inside: the gate that blocks the flow, the stem that moves it, and the seat rings that it seals against.
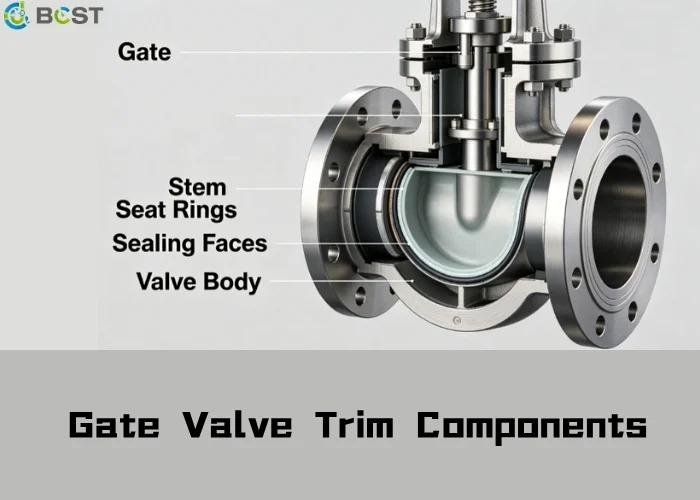
Let’s dig even deeper into these gate valve parts. Think of the valve as a small, specialized house built to control a powerful river flowing right through it. Each part of this house has a very specific job to make sure that river only flows when and how you want it to.
The Body, Bonnet, and Gasket: The Outer Shell
- Корпус клапана: This is the foundation and walls of the house. It’s the main structure that contains all the pressure and directs the flow from the inlet to the outlet. The material of the body—whether it’s everyday Carbon Steel or a tough alloy for corrosive service—is your first and most important line of defense. I’ve seen cheap castings fail under pressure, and trust me, it is not a pretty sight.
- Капот: The bonnet is the roof of our valve house. It’s the cover that seals the top of the body and holds all the internal gate valve parts in place. How it connects to the body, usually with bolts, is a critical point. A good seal here is everything.
- Bonnet Gasket: This is the weather stripping for your valve house, sitting right between the body and the bonnet. Its only job is to create a perfect seal so that none of the high-pressure fluid inside can escape. A failed gasket is one of the most common reasons for external leaks.
The Trim: The Moving Components at the Heart of the Клапан
The trim is where all the real work happens. These are the internal gate valve parts that are in constant contact with whatever is flowing through your pipe. Choosing the right trim materials is the single most important decision you will make, as it determines how long your valve will last and how well it will seal.
| Key Trim Part | Function & What to Know | Common Materials & Considerations |
|---|---|---|
| Gate (or Disc) | This is the door that moves up to allow flow and down to stop it. A solid wedge is the common workhorse. In high temperatures, things expand. A solid wedge will get stuck. That is why a flexible wedge, with a cut around the edge, is the choice for heat, as it flexes and maintains its seal. | Stainless Steel (316), Stellite (a hard facing), Monel. The hard-faced options are essential when you have grit or high speeds that wear parts down. |
| Стебель | This is the rod connecting the handwheel you turn to the gate inside. A rising stem is great because it moves up and down, so you see the valve’s position from across the room. If you’re tight on space, a non-rising stem stays put and is more compact. | 410 Stainless Steel is standard. 316 Stainless is better for corrosion. The stem must be strong enough not to bend or break under pressure. |
| Seat Rings | Think of these as the door frame. There are two of them, fixed inside the body. The gate presses against these rings to create a bubble-tight seal. Their surface has to be perfectly smooth. Any scratch or dent here is a direct path for a leak. | Stainless Steel, Stellite. The material here must be compatible with the gate material to avoid “galling,” which is when the metal surfaces scrape and seize up. |
| Упаковка | These are rings of soft material packed into a stuffing box in the bonnet. They squeeze around the stem to stop fluid from leaking out where the stem moves. This is where pesky leaks happen, especially the invisible ones that create regulatory problems. | Flexible Graphite is the standard for high heat. PTFE (Teflon) is amazing for chemicals but does not handle high temperatures. |
All these gate valve parts must work together perfectly. A slightly rough stem will tear up the packing and cause a leak. A gate and seat made of the wrong materials will destroy each other. Knowing this helps you choose a valve that isn’t just a temporary fix, but a long-term solution.
How to Inspect and Maintain Gate Valve Parts
Ignoring a tiny drip from a valve is like ignoring a small leak in your roof. It feels insignificant at first, but eventually, the ceiling collapses. There is a systematic, common-sense way to inspect your valves and prevent a major headache.
Proper inspection is regularly checking for leaks and other signs of wear. Maintenance is simple things like lubrication and adjustments. For a deep dive into the internal gate valve parts, you plan for it during a plant shutdown.
Keeping your gate valve parts in good shape isn’t complicated if you have a routine. It is all about staying ahead of problems instead of constantly reacting to them. As my friend Hassan always says, “A scheduled inspection costs pennies. An emergency shutdown costs a fortune.” Here is a practical strategy, based on my experience and his.
Safety First: This is Non-Negotiable
Before anyone puts a wrench on a valve, you must follow your Lockout/Tagout (LOTO) procedures. The line must be completely de-pressurized, drained, and isolated. This is the single most important step. It protects your people. Never work on a pressurized valve.
Routine Walk-Arounds (Weekly to Monthly)
This is simple ‘eyes and ears’ work you do as you walk the plant.
- Look for Leaks: Check the area around the stem where it comes out of the bonnet. Look for drips, wet spots, or stains. Check the big flange where the bonnet bolts to the body. For gas lines, a little soapy water in a spray bottle is your best friend—any bubbles mean a leak.
- Look for Corrosion: Check the outside of the valve for rust or pitting. Serious external corrosion weakens the body, which is a major safety risk.
- Turn the Handle: If a valve sits in one position for months, it will get stuck. Operate it from fully open to fully closed and back again once a month. As you turn the handwheel, feel for any grinding or stiffness. If it is tough to turn, the stem needs grease.
Simple Proactive Maintenance
A few simple tasks make a huge difference.
| Task | When to Do It | Why It Protects Your Gate Valve Parts |
|---|---|---|
| Lubricate the Stem | Every 3-6 months | This makes the handwheel easy to turn and stops the stem threads from getting chewed up or frozen shut. |
| Tighten Packing Bolts | When you see a small stem leak | Gently tighten the bolts on the packing gland to squeeze the packing and stop the leak. Do it in a star pattern, a little at a time. Overtightening will damage the packing and score the stem. |
| Clean the Stem | Ежемесячно | On a rising stem, the exposed threads collect dust and grime. Wipe them clean before you operate the valve, so that dirt doesn’t get dragged into the packing and ruin the seal. |
The Deep Dive (During Planned Shutdowns)
When the plant is down for maintenance, that is your golden opportunity to get inside your most critical valves.
- Take it Apart: After LOTO is confirmed, carefully unbolt the bonnet and lift it off. You then pull the stem and gate assembly right out.
- Inspect Everything: Clean all the gunk off the components. Look closely at the surfaces of the gate and the seat rings. You’re looking for pitting, scratches, or signs of erosion. These surfaces must be mirror-smooth to seal properly.
- Repair or Replace: Fix minor scoring on the seats by “lapping” them—using a special abrasive paste to polish the gate and seats together until they are a perfect match again. When the damage is deep, replace the worn gate valve parts or the entire valve. This is also the perfect time to replace the packing and gaskets. They are cheap parts that do a critical job.
Of course, all this maintenance is easier when you start with high-quality valves in the first place. This brings me back to my roots. My father built his valve factory on the principle that every single component matters. He knew, and I learned from him, that you do not cut corners. That is why I have so much confidence in our products at Клапан BCST. We oversee the manufacturing of every part, from the initial casting of the body to the final assembly of the trim. We know that reliability is built in, not added on later. If you need valves where every component is engineered for a long life, I encourage you to visit us at Клапан BCST.
Часто задаваемые вопросы
What are the most common points of failure in a gate valve?
Leaks are the most common issue. This happens either through the seat rings when the valve is closed (passing), or externally from the stem packing or bonnet gasket. The gate and seats also get worn down by erosion or corrosion.
What is the “trim” of a gate valve?
The trim refers to the internal parts of the valve that touch the fluid. In a gate valve, this means the gate (disc), the seat rings, and the stem. The trim material is the key to a valve’s long-term performance and reliability.
How does a rising stem differ from a non-rising stem?
A rising stem moves up and down on the outside of the valve as you open or close it, which gives you a clear visual sign of its position. A non-rising stem just spins in place; it is better for tight spaces where you don’t have overhead room.
Final Thought
Taking command of your system starts with understanding its most basic pieces. By knowing your gate valve parts, you gain control over reliability and stop failures before they start. For valves built with quality in every part, trust BCST to secure your flow.



 English
 Arabic
 Russian
 French
 Spanish