
Is Mastering Gate Valve Repair the Key to Uninterrupted Plant Operations?
That one leaking valve? It will shut down your whole operation, creating downtime and safety headaches. A good, quick gate valve repair is how you get back online, safe and sound.
A solid gate valve repair follows a clear path. You isolate the valve, drain the pressure, and take it apart. Check for worn parts like gaskets and packing and swap them out. Then, put it all back together and test it. This gives you a perfect seal and stops future problems.
One bad valve stops everything. I’ve seen it more times than I can count. I remember talking to a client, Hassan, a sharp chief engineer. He told me a story about a “minor” leak that forced a full shutdown. That little drip cost his company a fortune in lost production. It’s a powerful reminder that a proper gate valve repair isn’t just about fixing a part. It’s about keeping your whole operation running safely. Let’s talk about why this is so important and how you can get it right.
Proper Gate Valve Repair is Crucial for Plant Safety and Efficiency
Ignoring a small leak from a gate valve is a gamble. A small problem becomes a huge disaster. Getting the repair right from the start is how you protect your plant, your team, and your bottom line.
A good gate valve repair does more than just stop a leak. It prevents expensive shutdowns, keeps your team safe from dangerous spills, and makes the valve last longer. It’s smart maintenance that keeps the whole system healthy and saves a lot of money over time.
The Real Cost of a “Minor” Leak
The first thing that takes a hit when a gate valve fails is your production schedule. Every minute of downtime costs money. Beyond that, you have emergency labor costs, ruined product, and a chain reaction of problems down the line. Hassan, the engineer I mentioned, figured out that one shutdown day from that single failed valve cost his refinery over a million dollars. That’s why a smart approach to gate valve repair is an investment, not an expense. A good repair brings the valve back to life and prevents these costly surprises. Ignoring it means it will break on someone’s shift.
Safety Cannot Be Compromised
In a chemical plant or refinery, a leaky valve isn’t just a nuisance. It’s a serious safety hazard. A valve controls the flow of dangerous, flammable, or high-pressure fluids. A small drip fills a room with toxic gas or creates a slip-and-fall risk. A big failure causes a fire or an explosion. Proper gate valve repair puts safety first. That means you replace all the seals—gaskets, packing, everything—not just the one that broke. I grew up hearing stories from my father about accidents caused by cutting corners on repairs. Those lessons stick with you. A perfectly sealed valve protects your most important asset: your people.
Extending Asset Lifespan Through Quality Repair
Think of every valve as an investment. You want to get the most out of it. When you do a quality gate valve repair, you’re not just patching a leak; you’re bringing that asset back to full health. A quick and dirty fix works for a day or a week, but the problem comes back, and it’s worse. A real repair means taking it apart, looking at everything, and replacing any part that looks worn.
| Repair Action | Short-Term Outcome | Long-Term Impact |
|---|---|---|
| Just tightening a nut | Stop a small drip temporarily | This damages the stem and leads to a bigger, worse leak. |
| Replacing just one part | Fixes the immediate leak source | The other old parts are still there, and they will fail next. |
| A full, proper repair | Solves the problem for good | The valve lasts longer and you can trust it again. |
| Doing nothing | The leak continues | You’re setting yourself up for a catastrophic failure. |
A proper gate valve repair saves you from buying new valves all the time. It’s the difference between a small maintenance cost and a big capital expense.
The Essential Steps for a Successful Gate Valve Repair
Okay, you’ve found a leaking gate valve. Now what? You know it needs fixing, and doing it wrong is dangerous. Let’s walk through the steps for a safe and solid repair.
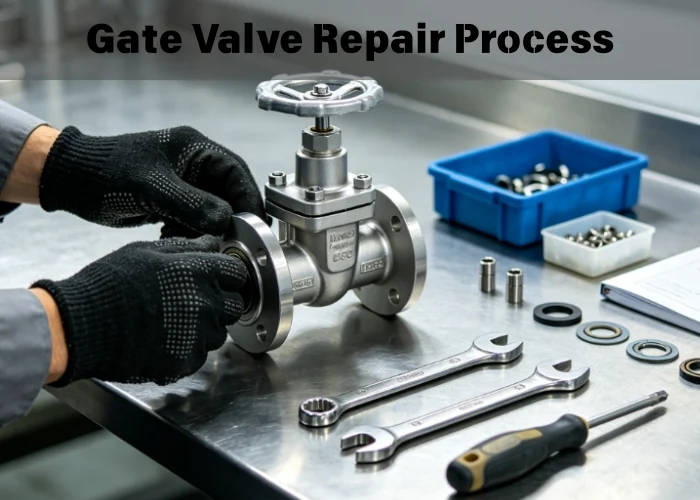
A good repair starts with safety: isolate the valve and release all pressure. Then, take it apart piece by piece. Look over everything, clean the surfaces, and replace old seals and packing. Put it back together carefully and test for leaks before you call it done.
Step 1: Preparation is Everything – Safety and Isolation
Before you pick up a single tool, you think about safety. This is step one of any gate valve repair. You cannot skip it. Shut off the valves on either side of the one you’re working on. Then, use a Lockout/Tagout (LOTO) procedure so no one can accidentally turn them back on. After that, you drain the pressure and fluid from that section of pipe. Never assume a line is empty. Check it. My dad drilled this into my head when I was starting on the factory floor: “The real work starts before you even pick up a tool.” He was right. A safe start means a safe finish.
Step 2: Careful Disassembly and Detailed Inspection
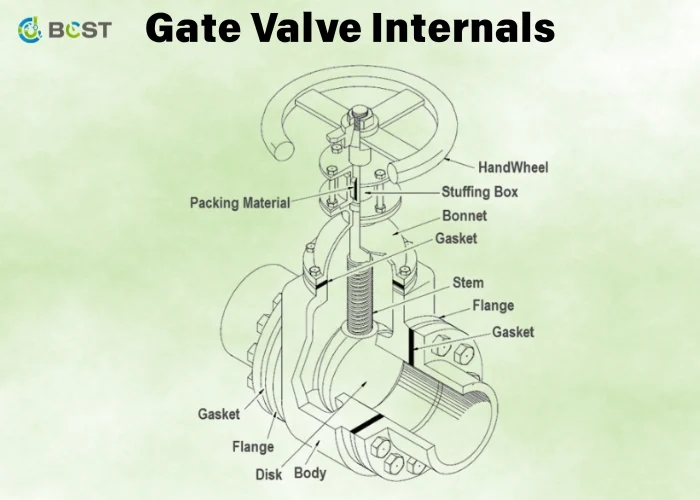
Once the valve is safe and isolated, you start taking it apart. Loosen the bonnet bolts in a star pattern to release pressure evenly. Then lift off the whole top assembly—bonnet, stem, and gate. Now you become a detective. Lay out every piece on a clean workbench. This part of the gate valve repair tells you the real story.
| Component to Inspect | What to Look For | Action to Take |
|---|---|---|
| Gate and Seats | Nicks, scratches, or pits. | If it’s minor, you polish it out. If it’s bad, replace the parts. |
| Stem | Is it bent, rusty, or scratched? Check where the packing sits. | A damaged stem tears up new packing. Replace it. |
| Packing | Is it hard, dry, or squished-looking? | Replace it. Packing is cheap insurance. |
| Gasket | Is it cracked, brittle, or flattened? | Always use a new bonnet gasket. They’re designed for one-time use. |
Clean everything until it’s spotless. Any gunk or old material you leave in the stuffing box or on the gasket surfaces will ruin your gate valve repair.
Step 3: Reassembly and Final Testing
Putting it back together is more than just doing the steps in reverse. You must be careful. Put the new packing rings in, and stagger the cuts on each ring. This creates the perfect seal. Put the new bonnet gasket on the clean valve body. Carefully lower the top assembly back on, ensuring the gate slides into its guides perfectly. Tighten the bonnet bolts slowly, using that star pattern again, to press the gasket down evenly. Then, gently tighten the packing gland nuts. They need to be just tight enough to prevent leaks—too tight makes the valve hard to turn. Now, you remove the LOTO and slowly bring the pressure back up. Watch closely for any drips. If it’s dry, you’ve nailed the gate valve repair.
Preventing Gate Valve Issues Before They Start
Always being in fire-fighting mode, fixing one emergency gate valve repair after another, is exhausting and expensive. Stop the problems before they even start.
Prevent future gate valve issues by creating a regular check-up schedule. Teach your team to use the valves correctly. And most importantly, use the right valve for the right job and install it properly from the very beginning.
The Power of a Preventive Maintenance Program
The best repair is the one you don’t have to do. A good Preventive Maintenance (PM) program finds small problems before they become big ones. What does that mean? First, walk the line. Look for leaks or rust. Second, keep everything lubricated. A little grease on the stem or gearbox makes a huge difference. Third, “work” the valve. A valve that sits in one position for a year gets stuck. Open and close it a few times during a shutdown to keep it moving freely. I helped Hassan’s team set up a PM plan, and they cut their emergency repair calls by 40% in the first year. It works.
Proper Operation: A Simple but Critical Factor
Most valve failures are not because the valve is faulty. They happen because of how the valve is used. The biggest mistake is using a gate valve to control the flow rate. Gate valves are like light switches: they’re meant to be fully on or fully off. Using one halfway open creates a jet of fluid that chews up the gate and seats. No gate valve repair fixes that kind of damage. Train your people. Make sure they know to open and close valves slowly to prevent water hammer. Tell them to never, ever use a “cheater bar” to force a stuck valve. You will break the stem before you get it open.
The Foundation: Correct Selection and Installation
Honestly, prevention starts with the purchase order. Choosing the right valve is half the battle. You need the right materials to handle your specific fluid, temperature, and pressure. If you put a basic carbon steel valve in a line with corrosive chemicals, you are creating a future failure. Then there’s the installation. A good valve installed badly is just a bad valve.
| Common Installation Mistake | Resulting Problem | How to Prevent |
|---|---|---|
| Pipes Don’t Line Up | This bends and cracks the valve body over time. | Get the pipes aligned and supported first, then install the valve. |
| Dirty Flanges | A bit of dirt or old gasket material causes a leak. | Always scrape and wipe down both flanges until they’re perfectly clean. |
| Wrong Bolting | Uneven pressure cracks a flange and ruins the gasket seal. | Tighten bolts a little at a time in a star pattern. Use a torque wrench. |
| Pipes Hanging on the Valve | The valve isn’t a pipe support. Its body cannot take the weight. | Make sure you have proper pipe supports on both sides of the valve. |
Get this stuff right from day one, and you’ll save yourself from a huge number of future headaches and the need for a gate valve repair.
A repair isn’t always the right call. If a valve is old, corroded, or a constant problem, replacing it is the smarter, safer move. I’ve watched good engineers like Hassan struggle with whether to repair a problem valve one more time or just invest in a new one. The peace of mind from a new, reliable valve is worth every penny. It’s what my family’s company, BCST Valve, is built on. We manufacture high-quality industrial valves that are built to last.
Frequently Asked Questions
Q1: How often should I inspect my gate valves?
A: For critical services, inspect visually every 3-6 months. For general services, an annual inspection during a planned shutdown is sufficient. Adjust based on operating conditions.
Q2: Can I repair a gate valve while it’s in service?
A: No. Never attempt to repair a gate valve’s main components while the line is pressurized. You must follow full isolation and LOTO procedures for safety. Only minor packing adjustments are acceptable.
Q3: What’s the most common reason a gate valve fails?
A: The most common failure is a leak through the packing from normal wear. The second most common is seat leakage caused by improper use (throttling) or debris in the line.
Q4: Should I always perform a gate valve repair or just replace it?
A: If the valve body is sound and the repair is simple (e.g., packing/gasket), repair is cost-effective. If the body is corroded or the gate/seats are severely damaged, replacement is safer and cheaper in the long run.
Final Thought
Don’t let a faulty valve shut you down. Mastering gate valve repair ensures reliability, and prevention strategies secure your plant’s future. For new installations or replacements where quality can’t be compromised, trust BCST to deliver the performance and peace of mind you deserve.



 English
 Arabic
 Russian
 French
 Spanish