
How to Properly Grease a Ball Valve: Avoid Over- or Under-Pressurization
Greasing a ball valve is a critical maintenance task that, when done correctly, can dramatically extend its lifespan, improve operational efficiency, and prevent costly leaks. However, it’s a process that demands precision. Injecting too little grease leaves the valve vulnerable to friction and wear, while over-pressurizing can damage internal components, destroy seals, or even lead to catastrophic valve body rupture.
This comprehensive, step-by-step guide is designed to equip maintenance technicians and engineers with the knowledge and techniques to properly grease ball valves, whether for lubrication or sealing, ensuring optimal performance without the risks of over- or under-pressurization.
Mastering this technique is not just about lubrication; it’s about asset integrity and operational safety.
Before You Start: Essential Preparations
Preparation is key to a safe and effective greasing operation.

1. Safety First: Personal Protective Equipment (PPE) & Procedures
- Always wear appropriate PPE: Safety glasses/face shield, gloves, and protective clothing are essential. High-pressure grease injection can be dangerous.
- Follow LOTO (Lockout/Tagout) and Isolation Procedures: While often done with the valve in service, ensure you understand the risks and have proper permits. Never begin work without verifying the valve’s status and knowing its downstream effects.
- Vent/Depressurize (if applicable and safe): Some procedures may require depressurizing the line or upstream/downstream pressure depending on valve type and operation.
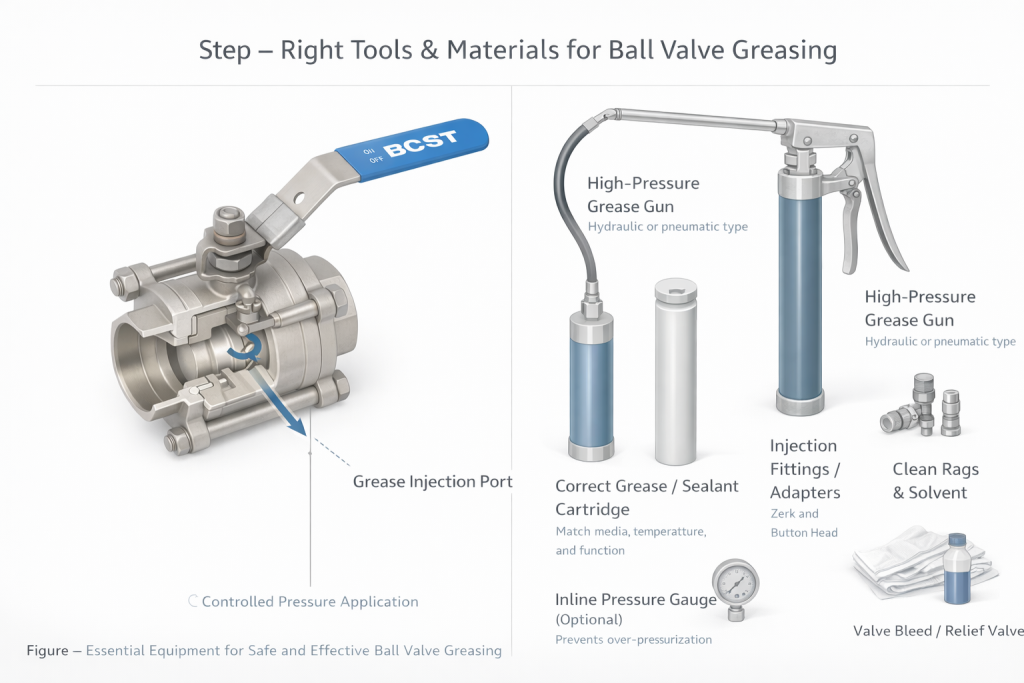
2. Gather the Right Tools & Materials
- High-Pressure Grease Gun: A specialized valve lubricant gun (often hydraulic or pneumatic) capable of delivering consistent pressure. Ensure it’s in good working order.
- Correct Grease/Sealant: This is critical. Refer to “How to Choose the Right Ball Valve Grease for Your Application” to select the appropriate compound for your process media, temperature, and needs (lubrication vs. sealing).
- Injection Fittings/Adapters: Ensure you have the correct fitting (e.g., Zerk, Giant Button Head) for your valve’s grease ports.
- Clean Rags & Solvent: For cleaning ports and handling spills.
- Pressure Gauge (Optional but Recommended): Some grease guns have an inline pressure gauge, which is excellent for monitoring pressure and preventing over-pressurization.
- Bleed/Relief Valve (for valve cavity): If the valve has one, ensure it’s functional.
3. Review Manufacturer’s Guidelines
Always consult the valve manufacturer’s specific instructions for greasing frequency, procedure, and recommended compounds. These guides are your ultimate authority.
Step-by-Step Guide: Proper Greasing Technique
-
Step 1: Position the Valve (if applicable) & Confirm Safety
Unless specifically instructed otherwise by the valve manufacturer, the ball valve should typically be in the fully open position for lubricating seats. This positions the seat and ball surfaces for optimal grease distribution. If you are greasing the stem packing, the valve can remain in its operational position. RE-CONFIRM Safety protocols.
-
Step 2: Clean the Injection Fitting
Thoroughly clean the grease injection port(s) with a rag to remove any dirt, rust, or old hardened grease. Contaminants introduced during greasing can clog internal pathways or damage seats.
-
Step 3: Attach the Grease Gun Securely
Connect the grease gun nozzle to the injection fitting. Ensure a tight, leak-free connection. A poor connection can lead to grease escaping around the fitting rather than entering the valve.
-
Step 4: Inject Slowly and Systematically – The Key to Proper Pressure
This is the most critical step for avoiding over- or under-pressurization. The goal is to inject just enough to achieve the desired effect (smooth operation, leak control) without forcing excess compound into the valve or overstressing components.
- Inject in Short Bursts: Instead of continuous pumping, inject one or two pumps (or a small, controlled amount if using a hydraulic gun), then pause.
- Listen and Feel for Resistance:
- Normal Injection: You should feel a moderate, consistent resistance.
- Signs of Under-Pressurization (Not Enough): Little to no resistance, the valve remains stiff, or the leak persists. Continue injecting slowly until you feel resistance or see results.
- Signs of Over-Pressurization (Too Much!):
- Sudden Increase in Resistance: The grease gun becomes very hard to pump.
- Grease Exiting Around Fitting: The pressure is too high within the valve, forcing grease back out.
- Using a Pressure Gauge: If your gun has one, ensure the pressure does not exceed the manufacturer’s recommended limit for the valve. Most valve grease ports are rated for 5,000-10,000 psi, but the *valve’s internals* are not.
- Visual Cues: If grease starts oozing from the valve stem, body joints, or into the pipeline (via the port if the valve is open), you’ve injected too much.
- Rotate the Valve (Important for Seat Greasing): After each few pumps, fully cycle the valve (open-close-open). This helps distribute the grease across the seating surfaces, pushes out old, hardened grease into the line, and allows you to feel if the operating torque is reducing. Continue this inject-and-cycle process until the valve operates smoothly or the leak is stopped.
- For Leaking Valves: If stopping a leak with sealant, inject slowly until the leak diminishes or stops. Over-injection can still damage seats.
-
Step 5: Monitor Performance & Bleed Excess (if applicable)
Once injected, operate the valve a few more times to ensure even distribution and confirm improved function (reduced torque, leak stopped). If your valve has a relief valve for the body cavity, you may need to open it briefly to relieve any excess pressure, especially if greasing a DPE (Double Piston Effect) seat design.
-
Step 6: Detach Grease Gun & Clean Up
Carefully detach the grease gun. Clean any excess grease from the injection port and the valve body. Reinstall any protective caps on the injection fittings.
-
Step 7: Document the Process
Record the date, the valve ID, the type and amount of grease injected, and any observations (e.g., initial stiffness, final operating torque, leak status). This data is invaluable for developing a proactive ball valve lubrication program.
Common Pitfalls & Best Practices
- Never Mix Greases: Using different grease types in the same valve can cause chemical reactions that degrade performance. Use dedicated grease guns for each product.
- Don’t Over-Tighten Injection Fittings: Hand-tighten and then a quarter turn with a wrench. Over-tightening can damage fittings.
- Preventative is Better Than Reactive: A regular greasing schedule (based on manufacturer recommendations and operational experience) reduces the chances of valves becoming stiff or leaking in the first place.
- Know Your Valve: Understand the design (e.g., floating ball vs. trunnion, soft-seated vs. metal-seated) as this affects greasing strategy.
Conclusión
Properly greasing a ball valve is an essential skill for anyone involved in industrial maintenance. By following these steps and paying close attention to the subtle cues the valve provides, you can effectively prevent over- or under-pressurization, ensuring smooth operation, effective sealing, and prolonging the life of your valuable assets. It’s an investment in safety and reliability that pays dividends in performance and reduced costs.
For high-quality ball valves designed for reliability and ease of maintenance, trust BCST Valve. We understand the importance of proper care and provide products built to last.
Need reliable ball valves or further maintenance advice?


 English
 Arabic
 Russian
 French
 Spanish