
How to Install and Maintain a True Union Ball Valve: A Technical Guide for Industrial Systems
Quick Guide: Installing and Maintaining True Union Ball Valves
- Installation: Ensure clean pipes, use proper solvent cement technique for plastic or sealant for threaded connections, and hand-tighten union nuts.
- Maintenance Key: The true union design allows for quick in-line service; simply untwist union nuts to remove the central valve body without cutting pipe.
- Repair: Easily replace worn O-rings and PTFE seats, extending valve life and minimizing material waste.
- Lifespan: Regular inspection, proper lubrication of O-rings, and avoiding over-tightening of union nuts are crucial for longevity.
In the demanding environments of the fuel, chemical, and industrial sectors, every moment of downtime translates directly into lost productivity and revenue. Traditional ball valves, when requiring servicing or replacement, often necessitate a costly and time-consuming process of cutting the pipe, halting operations across an entire section of a system. This is precisely why the True Union ball valve (also known as a double union ball valve) has become the gold standard: its design fundamentally changes the return on investment (ROI) by prioritizing repairability and rapid in-line maintenance. If you’re weighing your options. This comprehensive guide offers industrial owners and technicians a step-by-step walkthrough, from proper installation techniques to long-term maintenance strategies, ensuring optimal performance and minimal system interruption.
What is a True Union Ball Valve?
Before diving into installation and maintenance, it’s essential to understand the unique construction of a True Union ball valve.
Anatomy of a Double Union Design
A true union ball valve distinguishes itself with a three-piece body design. The central valve body, which houses the flow control mechanism, is flanked by two union nuts. These nuts secure the central body to end connectors that are permanently attached to the pipeline. Inside, a rotating ball, usually made of the same material as the body or a compatible, highly resistant plastic, is cradled by pressure-sealing PTFE seats and reinforced by stem O-rings. The entire assembly is designed for efficient quarter-turn operation.

The Key Advantage: Slipping the Valve Body Out of the Line
The primary benefit for industrial owners lies in this modularity. When service is required, the fluid supply is isolated, and the two union nuts are simply unscrewed. The central valve body can then be “slipped” out of the pipeline without needing to cut or disassemble the main piping. The end connectors remain fixed in the line. This capability dramatically reduces installation and system downtime, making it a game-changer for systems that require frequent cleaning, seal replacement, or inspections.
How Does a True Union Ball Valve Work?
Understanding the operational mechanics ensures proper functioning and helps in troubleshooting.
The Internal Mechanism: Ball, Stem, and PTFE Seats
When the valve handle is turned 90 degrees (a quarter-turn), it rotates a stem connected to a spherical ball inside the valve body. The ball has a bore (hole) through its center. When the handle is aligned with the pipe, the bore aligns, allowing fluid to flow. When the handle is perpendicular, the bore is blocked, stopping flow. The ball is typically supported by two PTFE seats, which provide excellent chemical resistance and a low-friction surface for rotation, contributing to a tight shut-off.
Sealing Technology: How the Union Nuts Compress the O-rings
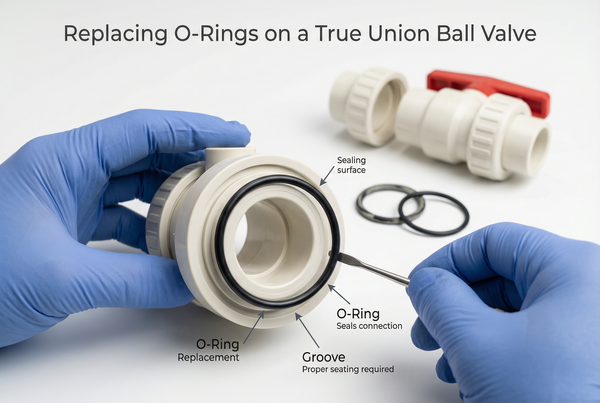
The leak-proof integrity of a true union valve relies on its O-ring lubrication and specialized sealing. O-rings, typically made of EPDM or Viton (depending on media compatibility), are strategically placed between the central valve body and the end connectors. When the union nuts are tightened, they compress these O-rings, creating a robust, durable, and highly reliable seal. This design, particularly when combined with proper O-ring lubrication, is what allows the valve to be disconnected and reconnected repeatedly without loss of seal integrity, a significant improvement over traditional threaded or flanged connections for maintenance purposes.
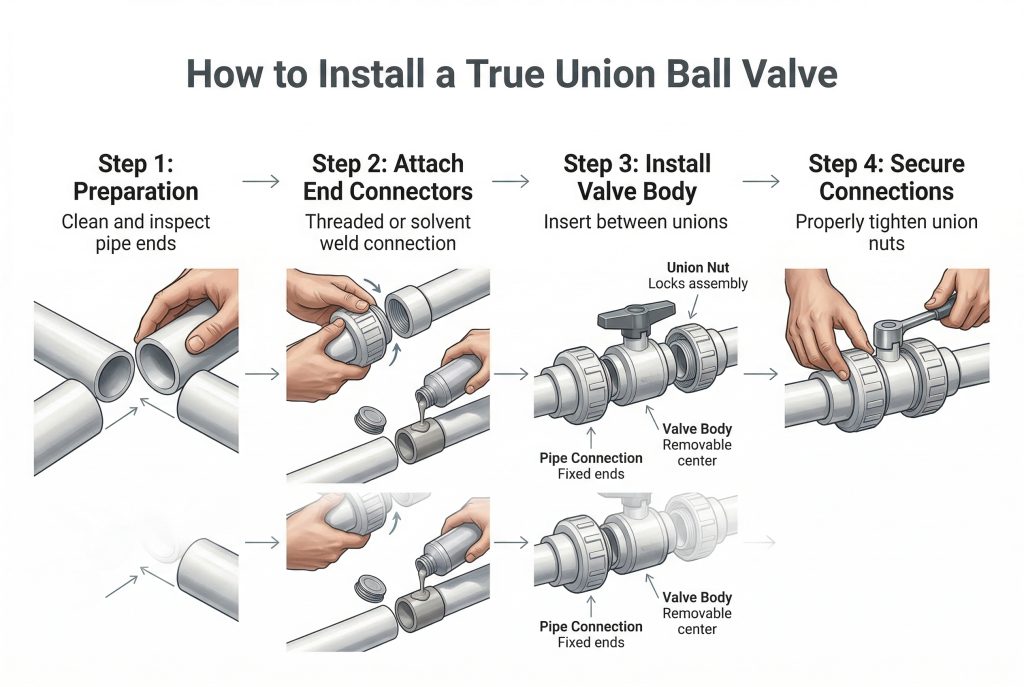
Step-by-Step: How to Install a True Union Ball Valve
Industry studies on the Economics of Downtime show that unplanned shutdowns in sectors like chemical processing or water treatment can cost between $10,000 and $250,000 per hour. Proper installation ensures longevity and prevents premature failure. Always refer to the manufacturer’s specific instructions for your valve model.
Step 1: Pre-Installation Check and Surface Preparation
Inspect the valve for any damage from shipping. Ensure all internal components, especially the O-rings and seats, are present and undamaged. Verify that the valve’s material (PVC, CPVC, or metal) is compatible with your fluid media and system operating temperature and pressure. Clean the pipe ends thoroughly, removing any dirt, grease, or burrs. Test-fit the end connectors onto the pipe without adhesive or sealant to ensure a proper fit.
Step 2: End Connector Attachment – Threaded vs. Solvent Welding
This step depends on your pipe material and connection type:
- For Threaded Connections (e.g., metal pipes or NPT plastic fittings): Apply a compatible pipe thread sealant or PTFE tape to the male pipe threads. Hand-tighten the end connectors initially, then use a pipe wrench to make a final secure connection. Avoid over-tightening, especially with plastic, which can cause cracking.
- For Solvent Welding (e.g., plastic PVC/CPVC pipes with socket ends): Apply appropriate primer to both the pipe end and the inside of the end connector socket. Follow immediately with a uniform coat of compatible solvent cement. Quickly join the pipe and end connector with a quarter-turn twist to ensure even distribution of cement, holding firmly for 30 seconds. Allow for adequate cure time before pressurizing, as per solvent cement instructions. Improper solvent welding can lead to solvent weld joint leaking.
Ensure the union nuts are slipped onto the pipe before attaching the end connectors.

Step 3: Assembling the Central Valve Body
Once the end connectors are securely attached to the pipeline and adequately cured (if solvent welded), lubricate the O-rings on the central valve body with a compatible silicone-based lubricant. Place the central valve body between the two end connectors, ensuring proper alignment. Slide the union nuts over the central body and thread them onto the end connectors.
Step 4: Proper Torque of Union Nuts
Hand-tighten the union nuts only. The design of a true union ball valve relies on the compression of the O-rings for sealing. Over-tightening these nuts, especially on plastic valves, can distort the O-rings, crack the nuts, or deform the valve body, leading to leaks or premature failure. Apply firm, even pressure until the nuts are snug. After initial pressure testing, re-check tightness and adjust if any seeping occurs.
Maintenance and Repair: The “True Union” Benefit
The true union design truly shines during maintenance. This feature provides in-line repairability, drastically cutting down on repair time and effort.
In-Line Serviceability: How to Remove the Valve Body for Seal Replacement
When maintenance is needed (e.g., a leaking stem or a degraded seat), simply follow these steps:
- Isolate the System: Shut off all upstream and downstream flow to the valve. Depressurize and drain the line.
- Unscrew Union Nuts: Loosen and remove both union nuts. The valve should be in the open position to depressurize any trapped fluid in the ball cavity before removal.
- Remove Central Body: Gently slide the central valve body out of the pipeline. The pipe and end connectors remain in place.
This process means no pipe cutting, no need for major tools, and significantly quicker repair times compared to a standard ball valve.
Replacing O-Rings and Seats: A Quick Guide to Extending the Valve’s Life
Once the central body is removed, it can be disassembled (typically by unscrewing the threaded carrier, depending on the design). You can then easily replace the worn O-rings (stem O-rings and body O-rings) and PTFE seats. Ensure replacement parts are identical in material and size to the original components and apply a thin layer of compatible gasket lubricant before reassembly. This cost-effective measure significantly extends the effective life of the valve, preventing the need for full valve replacement.
Troubleshooting Leaks: Identifying if the Leak is at the Union Nut or the Stem
A leak can occur at different points on a true union ball valve:
- Union Nut Leaks: Often caused by insufficient tightening (hand-tighten firmly) or degraded union O-rings. If initial tightening doesn’t stop the leak, replace the O-rings within the union. Remember proper O-ring lubrication.
- Stem Leaks: Indicated by dripping around the valve handle. This usually means the stem O-rings are worn or the carrier nut (gland nut) for the stem packing needs to be tightened. Many true union valves have an adjustable carrier; check manufacturer instructions for correct adjustment torque.
- Seat Leaks (Valve Passing Fluid when Closed): Typically caused by worn PTFE seats or debris trapped between the ball and seat. Requires disassembly of the central body for cleaning or seat replacement.
True Union vs. Standard Ball Valves: Which Should You Choose?
The decision between a true union and a standard ball valve (e.g., one-piece threaded or solvent weld) often comes down to balancing initial cost against long-term operational efficiency.
Cost Analysis: Initial Investment vs. Long-Term Maintenance Savings
A true union ball valve typically has a higher initial purchase price than a non-union or single-union ball valve of the same material and size. However, this upfront cost is often quickly recouped in industrial settings due to massive savings in system downtime and labor for maintenance. For systems requiring frequent servicing, or where accessibility is difficult, the ability to perform in-line maintenance outweighs the initial cost. Consider our analysis on the True Cost of a Solvent Weld Ball Valve for a closer look at the financial implications of different valve choices.
For applications where maintenance is rare or valves are in easily accessible, non-critical lines (and thus can be replaced entirely if faulty), a cheaper standard ball valve might be sufficient. But in critical process lines within the fuel and chemical industries, where production continuity is paramount, the true union design offers significant operational and financial advantages over its lifespan.
Frequently Asked Questions About Installing and Maintaining True Union Ball Valves
Q: Can you install a true union ball valve backwards?
Most standard true union ball valves are bi-directional, meaning they can function effectively regardless of flow direction. They do not have a designated “inlet” or “outlet” port. However, it’s always best practice to check the manufacturer’s specifications. Some specialized ball valves (e.g., certain chemical-resistant or high-pressure designs) might have a preferred flow direction indicated by an arrow on the body, especially if they have specific seat designs. If no arrow is present, assume bi-directional flow.
Q: Do I need to lubricate the union O-rings?
Yes, it is highly recommended to lubricate the O-rings on the central valve body with a compatible silicone-based lubricant before assembly. This aids in smooth assembly, prevents the O-rings from pinching or tearing during tightening, and helps maintain a long-lasting, leak-free seal. Avoid petroleum-based lubricants, especially with EPDM O-rings, as they can cause degradation.
Q: Can you use a true union valve for compressed air?
While some true union ball valves (especially those made of metal) can be used for compressed air, caution is advised, particularly for plastic PVC or CPVC valves. Plastic valves can shatter explosively under high-pressure compressed air, posing a significant safety hazard. PVC and CPVC are generally NOT recommended for compressed air or gas service due to the risk of brittle fracture under pressure.
Q: How tight should the union nuts be?
The union nuts should be hand-tightened firmly until snug. Avoid using pipe wrenches or excessive force, especially on plastic valves. The sealing mechanism relies on the O-rings being compressed, not on brute force. Over-tightening can distort the O-rings, stress the plastic, or even crack the union nuts, leading to leaks or damaging the valve. If a hand-tightened union nut leaks after pressurization, inspect the O-rings for damage and ensure they are properly seated and lubricated.
Conclusion
The true union ball valve stands as a testament to efficient industrial design, offering unparalleled advantages in in-line maintenance and system uptime. Its ability to facilitate rapid repairs, coupled with comprehensive material compatibility options, makes it the optimal choice for fuel and chemical systems that demand reliability and cost-effectiveness over their operational lifespan. By mastering the installation techniques—from proper solvent welding to appropriate union nut torque—and adhering to a diligent maintenance schedule that includes O-ring lubrication and seat replacement, industrial owners can ensure their systems run smoothly and safely for years to come.
Upgrading your fuel system instrumentation with high-performance valves?


 English
 Arabic
 Russian
 French
 Spanish