
Neglecting butterfly valve maintenance can lead to unexpected failures, causing costly downtime and safety risks. A proactive approach is essential for plant reliability and operational efficiency.
Effective butterfly valve maintenance involves regular visual inspection, functional testing, cleaning, and targeted lubrication. It also requires the timely replacement of wear parts like seats and seals to prevent leaks and ensure smooth operation, extending the valve’s service life.
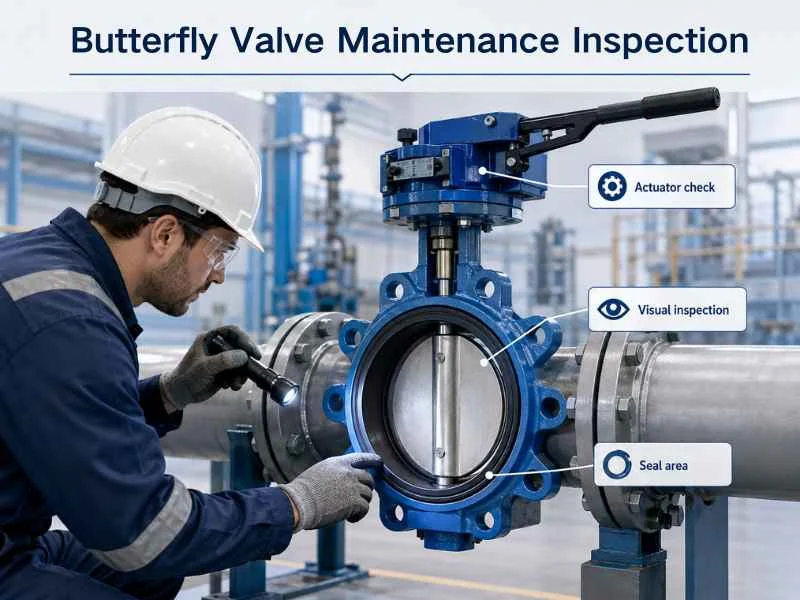
This guide provides a practical framework for maintaining your butterfly valves. We will explore routine inspection schedules, troubleshooting common issues, and building a preventative maintenance strategy. These steps will help you enhance plant safety, reduce unexpected shutdowns, and protect your valuable assets.
Routine Inspection and Cleaning Procedures
Regular inspections are your first defense against valve failure. Overlooking small signs of wear can allow minor issues to escalate into major operational problems.
A robust inspection plan includes checking for external damage, leaks around the stem and flanges, and correct actuation. Consistent cleaning prevents debris buildup, which can obstruct movement and cause premature wear.
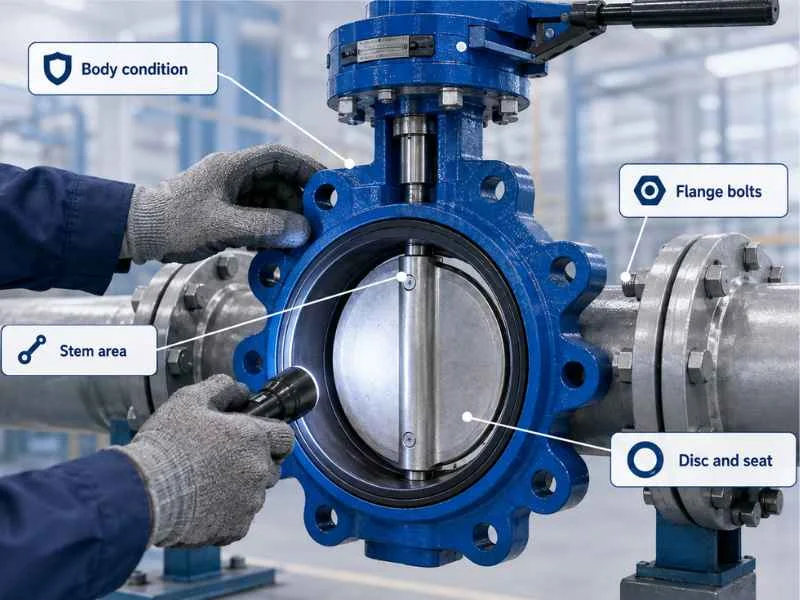
A structured inspection process is critical for identifying potential failures before they occur. Your maintenance team should have a clear checklist to follow, ensuring consistency and thoroughness. The frequency of these checks depends heavily on the service conditions. For critical applications involving corrosive media or high cycles, monthly inspections are advisable. For general service, quarterly or semi-annual checks may suffice.
Your visual inspection should cover several key areas:
- External Body: Look for signs of corrosion, cracks, or physical impact. Check the integrity of the paint or coating, as it provides a primary layer of protection against the environment.
- Mounting and Connections: Ensure all flange bolts are tight and secure. Check for any signs of leakage at the flange gaskets. A loose connection is a common source of fugitive emissions.
- Actuator: Inspect the valve actuator, whether it’s a manual lever, gearbox, or an automated pneumatic or electric unit. Look for damaged wiring, leaking air lines, or signs of corrosion.
- Stem Area: The point where the stem exits the valve body is a critical seal area. Look for any weeping or product buildup, which indicates a failing stem packing.
Beyond visual checks, operational tests are essential. Cycle the valve from fully open to fully closed. The movement should be smooth and complete the full 90-degree rotation without excessive force. Listen for any unusual grinding or squeaking noises, which could signal internal debris or worn components. The butterfly valve’s working principle depends on this unobstructed rotation.
Cleaning is a fundamental part of maintenance. Remove any dirt, grime, or process media buildup from the external body and actuator. For internal cleaning, which may require removing the valve from the line, use methods that won’t damage the internal components. For a rubber-lined butterfly valve, for instance, avoid harsh chemical solvents that could degrade the elastomer.
Addressing Common Butterfly Valve Maintenance Issues
Even with proper inspections, problems like seat leakage and actuation faults can arise. Knowing how to troubleshoot them quickly is vital for maintaining uptime.
The most frequent issues are seat leakage, stem leakage, and sluggish or failed actuation. Resolving them often involves replacing worn seals, adjusting packing, or verifying actuator settings before a complete failure happens.
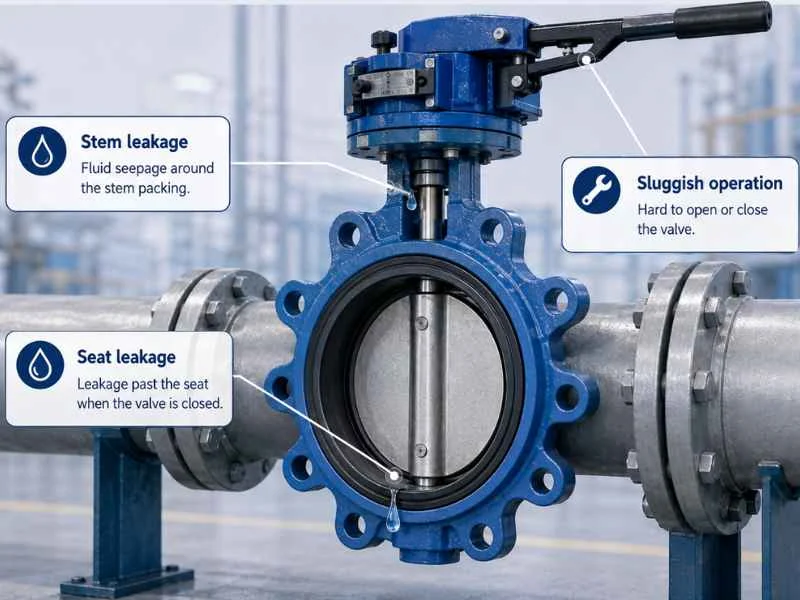
Diagnosing the root cause of a problem is more effective than just treating the symptom. A systematic approach helps you apply the correct fix and prevent the issue from recurring. For example, a leaking seat might not be a faulty seat but rather an incorrectly set actuator that isn’t closing the valve completely. The table below outlines common problems and their initial troubleshooting steps.
| Problem | Potential Cause(s) | Recommended Solution(s) |
|---|---|---|
| Seat Leakage (Valve Passing) | 1. Debris trapped between disc and seat. 2. Worn, hardened, or damaged seat. 3. Incorrect actuator torque setting. 4. Disc misalignment. |
1. Cycle the valve to dislodge debris. If necessary, remove and clean. 2. Inspect the seat and replace if damaged or worn. 3. Verify actuator open/close limit stops are set correctly. 4. Check and correct disc alignment per manufacturer guide. |
| Stem Leakage | 1. Loose packing gland bolts. 2. Worn or degraded stem packing/O-rings. 3. Scored or corroded valve stem. |
1. Tighten packing gland bolts in a star pattern (1/4 turn at a time). 2. If tightening fails, replace the stem packing or O-rings. 3. Inspect the stem during packing replacement. Replace the stem if damaged. |
| Difficult or Sluggish Operation | 1. Inadequate lubrication. 2. Insufficient actuator supply pressure. 3. Internal corrosion or media buildup. 4. Damaged stem or bushings. |
1. Lubricate the actuator gearbox or moving parts. 2. Check air/hydraulic supply pressure against actuator requirements. 3. Remove the valve and clean internals. 4. Disassemble and inspect internal components. Replace as needed. |
Different types of butterfly valves require distinct maintenance considerations. A soft-seated valve relies on an interference fit between the disc and a resilient seat, like EPDM or NBR. If this seat is damaged, it must be replaced to restore a tight seal.
In contrast, high-performance and triple offset butterfly valves often use metal or laminated seats. These are designed for higher pressures and temperatures. A leak in a metal-seated valve might require lapping the sealing surfaces or a more complex repair by a trained technician, rather than a simple seat replacement. Similarly, a PTFE-lined butterfly valve offers excellent chemical resistance, but its seat can be damaged by abrasive particles or improper installation, requiring careful handling during maintenance.
Developing a Preventative Maintenance Strategy
A reactive maintenance approach is costly and introduces unnecessary safety risks. A proactive, preventative strategy improves plant safety, reduces costs, and boosts reliability.
A successful preventative maintenance (PM) plan involves a documented schedule for inspection, lubrication, and parts replacement. It also requires training personnel and maintaining a strategic inventory of essential spare parts.
Establishing a Maintenance Schedule
The foundation of a good PM program is a well-defined schedule. Not all valves are created equal; their importance varies based on their function. Categorize your butterfly valves to prioritize maintenance efforts effectively.
- Critical Valves: These are valves whose failure would cause a safety incident, environmental release, or major production loss. They require the most frequent and thorough inspections, often monthly.
- Essential Valves: Failure of these valves would impact production efficiency or product quality but not cause a major incident. These can be scheduled for quarterly or semi-annual checks.
- General Service Valves: These are valves in non-critical systems like utility water. Annual inspections are typically sufficient.
Use a Computerized Maintenance Management System (CMMS) to track schedules, record findings, and manage work orders. This creates a valuable data history that helps you refine your maintenance intervals over time.
Spares Management and Documentation
Waiting for a spare part during an unplanned shutdown is a costly delay. A key part of your PM strategy is managing a stock of essential spares. For butterfly valves, this primarily includes “soft goods.”
Your on-site inventory should include:
- Seats
- Stem packing sets and O-rings
- Flange gaskets
The specific materials (e.g., EPDM, Viton, PTFE) should match the valves installed in your facility. For critical valves, it is wise to keep a complete spare valve assembly on hand for a quick change-out, minimizing downtime.
Accurate documentation is just as important as the physical work. Every inspection, repair, and part replacement must be recorded. This log should include the date, the technician’s name, the findings, and the actions taken. This data is invaluable for failure analysis and optimizing your spare parts inventory.
Training and Lubrication
Your maintenance personnel are your most important asset. Ensure they are properly trained on the specific procedures for the butterfly valves in your facility. Training should cover safe isolation procedures, proper disassembly and reassembly techniques, correct torque values for bolting, and how to set actuator limits.
Finally, establish a systematic lubrication program for actuators and gearboxes. Use only the lubricant type specified by the manufacturer. Applying the wrong grease or oil can cause more harm than good. Lubricate at a frequency based on the manufacturer’s recommendation and the operating environment.
Frequently Asked Questions About Butterfly Valve Maintenance
How often should I schedule butterfly valve maintenance?
The frequency of butterfly valve maintenance depends on service conditions and criticality. For critical valves in corrosive or high-cycle applications, monthly inspections are recommended. For general service, quarterly or annual checks are often sufficient. Always start with the manufacturer’s recommendations and adjust based on your operational experience and environment.
What is the most critical part of butterfly valve maintenance for preventing leaks?
The most critical steps involve the seals. Regularly inspect the valve seat for wear, hardening, or damage, as it’s the primary seal. Also, check the stem packing area for any signs of leakage. Tightening the packing gland or replacing the packing seals can prevent fugitive emissions. Ensuring the actuator fully closes the disc against the seat is also essential.
Can you perform butterfly valve maintenance while the valve is still in the pipeline?
Some butterfly valve maintenance tasks can be done in-line. These include visual inspections, lubricating the actuator, tightening packing gland bolts, and checking flange connections. However, internal tasks like replacing the seat or disc require the valve to be removed from the line. This must be done after proper system isolation and depressurization (Lockout/Tagout).
What are the essential tools for basic butterfly valve maintenance?
For basic butterfly valve maintenance, you will need a set of standard hand tools, including wrenches for flange bolts and packing gland nuts. A torque wrench is crucial for tightening bolts to the correct specification to prevent leaks or damage. You’ll also need packing removal tools, cleaning cloths, wire brushes, and the manufacturer-recommended lubricant for the actuator.
How does the service fluid affect butterfly valve maintenance needs?
The service fluid significantly impacts butterfly valve maintenance. Corrosive or abrasive media can accelerate the wear of seats, seals, and the disc. This requires more frequent inspections and faster replacement of soft components. For example, a valve handling a slurry will need more frequent checks for seat wear than one handling clean water. Material compatibility is key to longevity.
Final Thought
Effective butterfly valve maintenance is about prevention, not just reaction. A structured plan based on regular inspection, proactive repair, and strategic spares management protects your assets, ensures personnel safety, and maximizes plant availability.
To ensure long service life with minimal downtime, start with a reliable product. For high-quality butterfly valves engineered for durability and ease of maintenance, contact the BCST team. We can help you select the optimal valve for your specific service conditions.



 English
 Arabic
 Russian
 French
 Spanish